This article is about the AnimatedOpacity widget in Flutter.
Table of Contents
Preface
The purpose of AnimatedOpacity, as the name implies, is to animate its child’s opacity over a given duration:
AnimatedOpacity({
  Key? key,
  Widget? child,
  required double opacity,
  Curve curve = Curves.linear,
  required Duration duration,
  VoidCallback? onEnd,
  bool alwaysIncludeSemantics = false
})
You can control the rate of animation change over time with the curve property. In the following example, we’ll use:
- Curves.easeInOut: starts slowly, speeds up, and then ends slowly
- Curves.bounceInOut: first grow and then shrinks in magnitude
- Curves.elasticInOut: grows and then shrinks in magnitude while overshooting bounds
The Complete Example
Preview
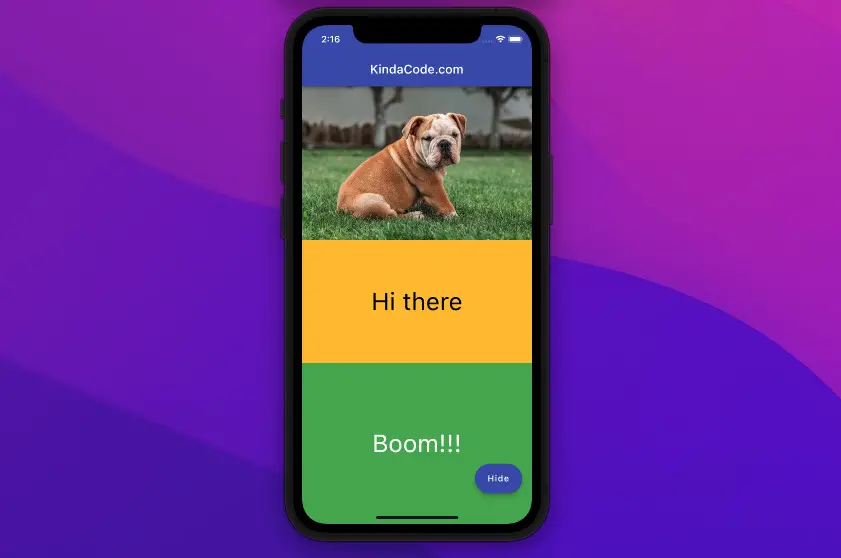
The sample app we’re going to build has a floating button. When this button gets pressed for the first time, a picture, an amber box, and a green box will go from invisible to fully visible. Those things change from visible to invisible when the floating button is pressed a second time. Note that each has a different animation curve.
The Code
// main.dart
import 'package:flutter/material.dart';

void main() {
  runApp(const MyApp());
}

class MyApp extends StatelessWidget {
  const MyApp({Key? key}) : super(key: key);
  @override
  Widget build(BuildContext context) {
    return MaterialApp(
        // Remove the debug banner
        debugShowCheckedModeBanner: false,
        title: 'KindaCode.com',
        theme: ThemeData(
          primarySwatch: Colors.indigo,
        ),
        home: const HomePage());
  }
}

class HomePage extends StatefulWidget {
  const HomePage({Key? key}) : super(key: key);

  @override
  State<HomePage> createState() => HomePageState();
}

class HomePageState extends State<HomePage> {
  // the opacity
  double _opacity = 0;

  @override
  Widget build(BuildContext context) {
    return Scaffold(
        appBar: AppBar(
          title: const Text("KindaCode.com"),
        ),
        body: Column(
          children: [
            // Using Curves.easeInOut
            AnimatedOpacity(
              duration: const Duration(seconds: 3),
              curve: Curves.easeInOut,
              opacity: _opacity,
              child: Image.network(
                "https://www.kindacode.com/wp-content/uploads/2022/04/puppy.jpeg",
                fit: BoxFit.cover,
              ),
            ),
            // Using Curves.bounceIn
            AnimatedOpacity(
                duration: const Duration(seconds: 3),
                curve: Curves.bounceInOut,
                opacity: _opacity,
                child: Container(
                  width: double.infinity,
                  height: 200,
                  color: Colors.amber,
                  child: const Center(
                    child: Text(
                      'Hi there',
                      style: TextStyle(fontSize: 40, color: Colors.black),
                    ),
                  ),
                )),
            // Using Curves.elasticInOut
            Expanded(
              child: AnimatedOpacity(
                  duration: const Duration(seconds: 3),
                  curve: Curves.elasticInOut,
                  opacity: _opacity,
                  child: Container(
                    width: double.infinity,
                    color: Colors.green,
                    child: const Center(
                      child: Text(
                        'Boom!!!',
                        style: TextStyle(fontSize: 40, color: Colors.white),
                      ),
                    ),
                  )),
            ),
          ],
        ),
        // this button is used to trigger the transition
        floatingActionButton: FloatingActionButton.extended(
          onPressed: () {
            setState(() {
              _opacity = _opacity == 0 ? 1 : 0;
            });
          },
          label: Text(_opacity == 0 ? 'Show' : 'Hide'),
        ));
  }
}
Afterword
We’ve examined a complete example of using AnimatedOpacity in Flutter. It makes the appearance or departure of a widget more natural and beautiful. If you’d like to explore more new and interesting stuff about modern Flutter, take a look at the following articles:
- How to Get Device ID in Flutter (2 approaches)
- Ways to Cancel a Future in Flutter and Dart
- Flutter: Convert UTC Time to Local Time and Vice Versa
- Create a Custom NumPad (Number Keyboard) in Flutter
- How to make an image carousel in Flutter
- How to implement Star Rating in Flutter
You can also take a tour around our Flutter topic page and Dart topic page to see the latest tutorials and examples.

