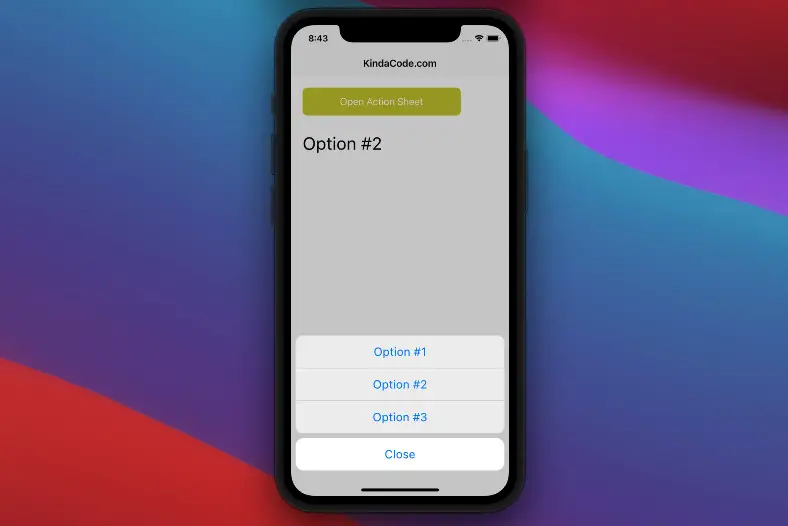
This article is about the CupertinoActionSheet widget in Flutter.
Table of Contents
Overview
The CupertinoActionSheet widget is used to create an iOS-style action sheet.
An action sheet presents multiple choices related to an intentional user action. On small screens, an action sheet slides up from the bottom of the screen. On larger screens, an action sheet appears all at once as a popover.
Constructor:
CupertinoActionSheet({
  Key? key,
  Widget? title,
  Widget? message,
  List<Widget>? actions,
  ScrollController? messageScrollController,
  ScrollController? actionScrollController,
  Widget? cancelButton
})
Each choice of an action sheet should be implemented by using a CupertinoActionSheetAction widget:
CupertinoActionSheetAction({
  Key? key,
  required VoidCallback onPressed,
  bool isDefaultAction = false,
  bool isDestructiveAction = false,
  required Widget child
})
The Example
App Preview
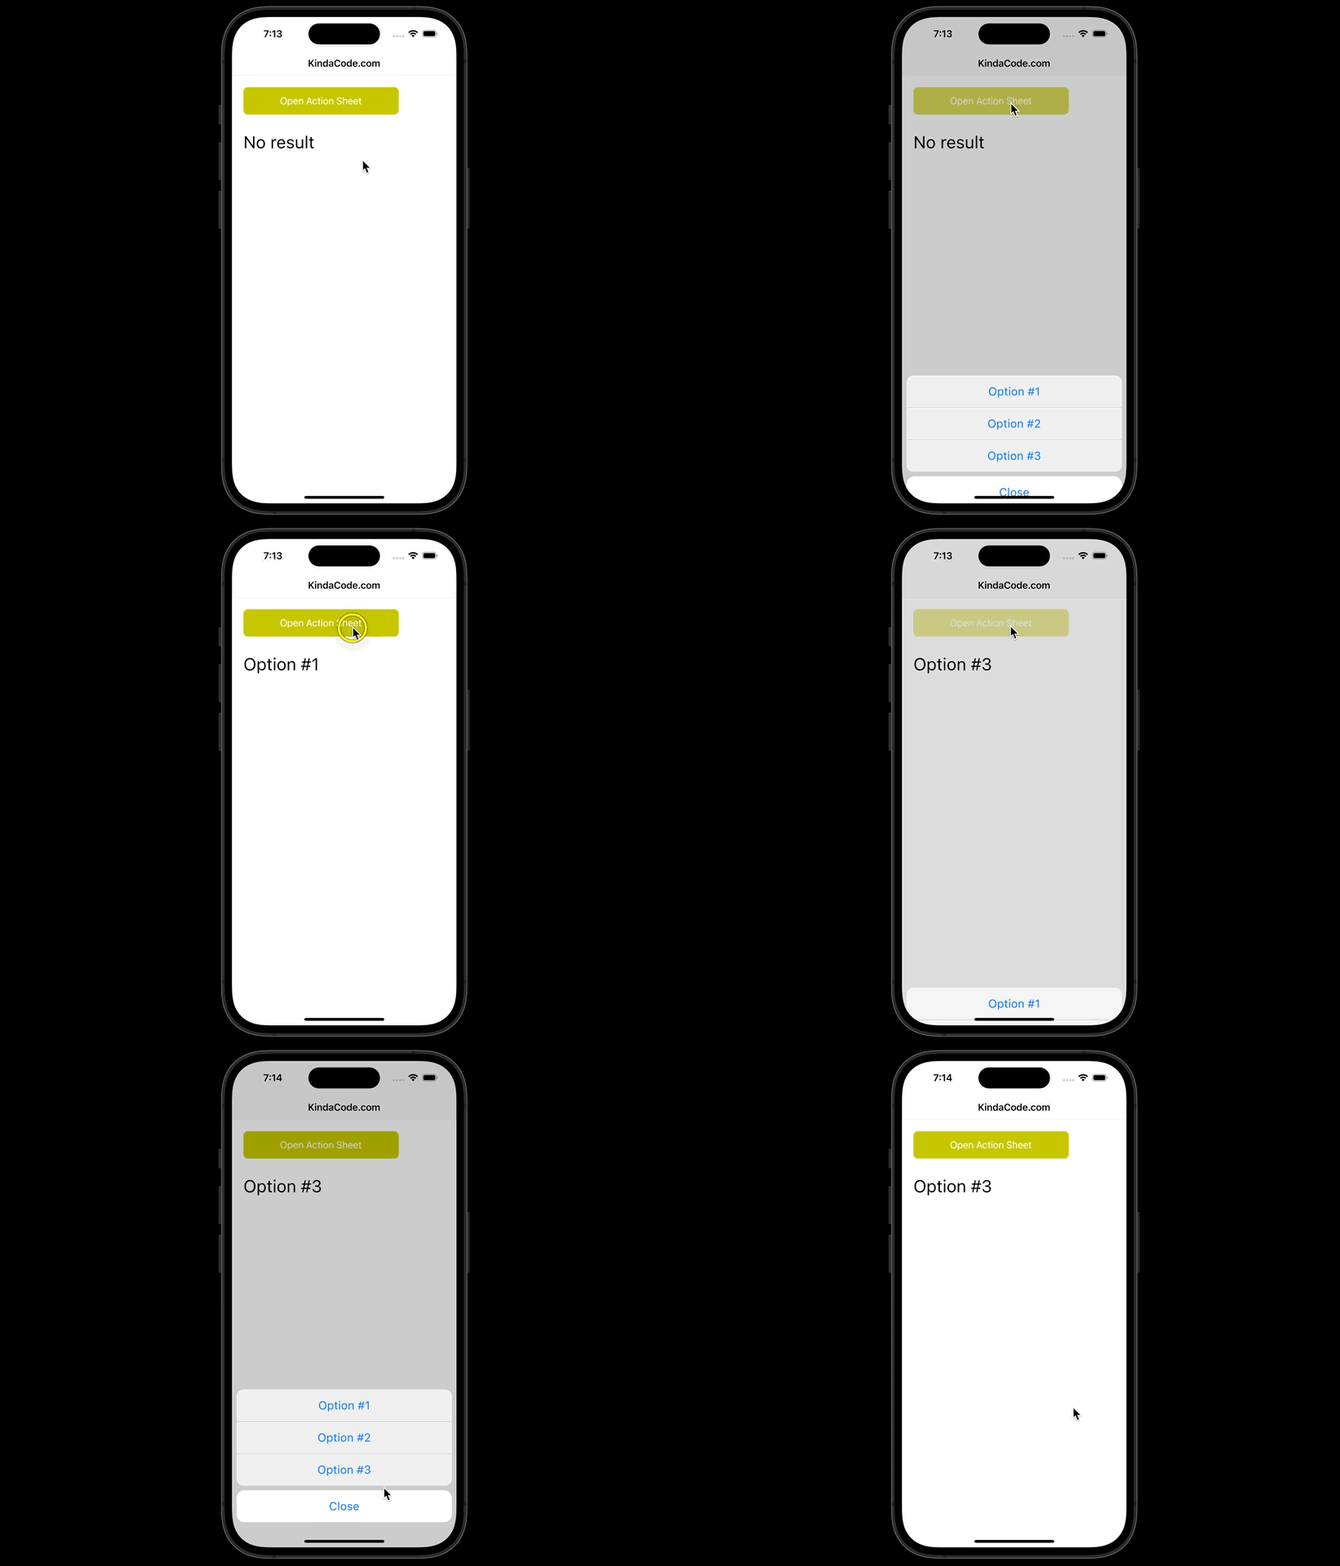
The sample app we are going to build has a button. When this button is pressed, a Cupertino action sheet will show up and let the user select one of these three options: Option #1, Option #2, and Option #3. The result will be displayed right below the button by using a Text widget.
Our action sheet can be closed in one of the following ways:
- An option gets selected.
- The Close button is pressed.
- The user clicks somewhere outside the action sheet.
Here’s how it works:
The Code
The function that shows the Cupertino ActionSheet:
  // This function is used to show the action sheet
  // It will be triggered when the button gets pressed
  void _show(BuildContext ctx) {
    showCupertinoModalPopup(
        context: ctx,
        builder: (_) => CupertinoActionSheet(
              actions: [
                CupertinoActionSheetAction(
                    onPressed: () {/*...*/},
                    child: const Text('Option #1')),
                CupertinoActionSheetAction(
                    onPressed: () {/*...*/},
                    child: const Text('Option #2')),
                CupertinoActionSheetAction(
                    onPressed: () {/*...*/},
                    child: const Text('Option #3')),
              ],
              cancelButton: CupertinoActionSheetAction(
                onPressed: () => _close(ctx),
                child: const Text('Close'),
              ),
            ));
}
The function that closes the Action Sheet:
void _close(BuildContext ctx) {
    Navigator.of(ctx).pop();
}
The complete code in lib/main.dart (with explanations):
import 'package:flutter/cupertino.dart';

void main() {
  runApp(const MyApp());
}

class MyApp extends StatelessWidget {
  const MyApp({Key? key}) : super(key: key);

  @override
  Widget build(BuildContext context) {
    return const CupertinoApp(
      // Remove the debug banner
      debugShowCheckedModeBanner: false,
      title: 'Kindacode.com',
      home: MyHomePage(),
    );
  }
}

class MyHomePage extends StatefulWidget {
  const MyHomePage({Key? key}) : super(key: key);

  @override
  State<MyHomePage> createState() => _MyHomePageState();
}

class _MyHomePageState extends State<MyHomePage> {
  // This function is used to show the action sheet
  // It will be triggered when the button gets pressed
  void _show(BuildContext ctx) {
    showCupertinoModalPopup(
        context: ctx,
        builder: (_) => CupertinoActionSheet(
              actions: [
                CupertinoActionSheetAction(
                    onPressed: () {
                      setState(() {
                        _selectedOption = "Option #1";
                      });
                      _close(ctx);
                    },
                    child: const Text('Option #1')),
                CupertinoActionSheetAction(
                    onPressed: () {
                      setState(() {
                        _selectedOption = "Option #2";
                      });
                      _close(ctx);
                    },
                    child: const Text('Option #2')),
                CupertinoActionSheetAction(
                    onPressed: () {
                      setState(() {
                        _selectedOption = "Option #3";
                      });
                      _close(ctx);
                    },
                    child: const Text('Option #3')),
              ],
              cancelButton: CupertinoActionSheetAction(
                onPressed: () => _close(ctx),
                child: const Text('Close'),
              ),
            ));
  }

  // This function is used to close the action sheet
  void _close(BuildContext ctx) {
    Navigator.of(ctx).pop();
  }

  // This is what you select from the action sheet
  String? _selectedOption;

  @override
  Widget build(BuildContext context) {
    return CupertinoPageScaffold(
        navigationBar:
            const CupertinoNavigationBar(middle: Text('KindaCode.com')),
        child: SafeArea(
          child: Padding(
            padding: const EdgeInsets.all(20),
            child:
                Column(crossAxisAlignment: CrossAxisAlignment.start, children: [
              // The button
              CupertinoButton(
                color: const Color.fromRGBO(200, 200, 0, 1),
                onPressed: () => _show(context),
                child: const Text('Open Action Sheet'),
              ),
              const SizedBox(
                height: 30,
              ),
              // Display the result
              Text(
                _selectedOption != null ? '$_selectedOption' : 'No result',
                style: const TextStyle(fontSize: 30),
              )
            ]),
          ),
        ));
  }
}
Afterword
You’ve learned the fundamentals of the CupertinoActionSheet widget in Flutter and examined an end-to-end example of using it in practice. If you’d like to explore more iOS-style things in Flutter, take a look at the following articles:
- Flutter Cupertino Button – Tutorial and Examples
- How to use Cupertino icons in Flutter
- Flutter CupertinoSegmentedControl Example
- Example of CupertinoSliverNavigationBar in Flutter
- Working with Cupertino Bottom Tab Bar in Flutter
You can also take a tour around our Flutter topic page and Dart topic page to see the latest tutorials and examples.


