This article covers the most important aspects you need to know when working with Flutter and Firebase Firestore. We will walk through the basics of Firestore, and later, we will build a complete application that lets a user create, update, read, and delete some fiction products.
Note: CRUD stands for Create, Read, Update, and Delete, the four basic operations of persistent storage.
This article was recently updated to work well with the latest versions of Flutter and fix some minor bugs.
Prerequisites
To get the most out of this tutorial, you need the following:
- Basic knowledge about Flutter.
- Flutter version 3.3.10 or higher.
- A registered Firebase account with a ready-to-use project.
- A clean Flutter project with the firebase_core plugin installed and correctly configured. If you don’t, see the following guide before moving to the next section: Flutter: Configure Firebase for iOS and Android.
- Knowing Firebase’s terms of service.
Overview
Cloud Firestore is a NoSQL document database from Google that lets you easily store, sync, and query data. It gives us the ability to quickly build applications of all sizes, from small to large, without having to worry too much about the backend stuff.
Firestore is Firebase’s newest database for mobile development. It builds on the successes of the Realtime Database with a new, more intuitive data model. If you have some experience with Realtime Database, you will absorb this article quickly. If you don’t, you will also absorb this article quickly (I guess that).
Besides firebase_core, we need another plugin named cloud_firestore for the project we are going to build.
The Complete Example
App Preview
As said above, this example app lets a user create, update, read, and delete fiction products. Its UI is neat and clean, with a single screen, a ListView, a bottom sheet, and a floating button. Here’s how it works:
Note: If you’re using Safari, this demo video might not work nicely or not start at all. Please use Chrome, Edge, Firefox, or another web browser instead.
As you can see, Firebase is so wonderful. Any changes will be presented on Firebase without refreshing the browser.
Creating a Firestore database
This section is intended to be as clear as possible. If you feel tedious, just move faster.
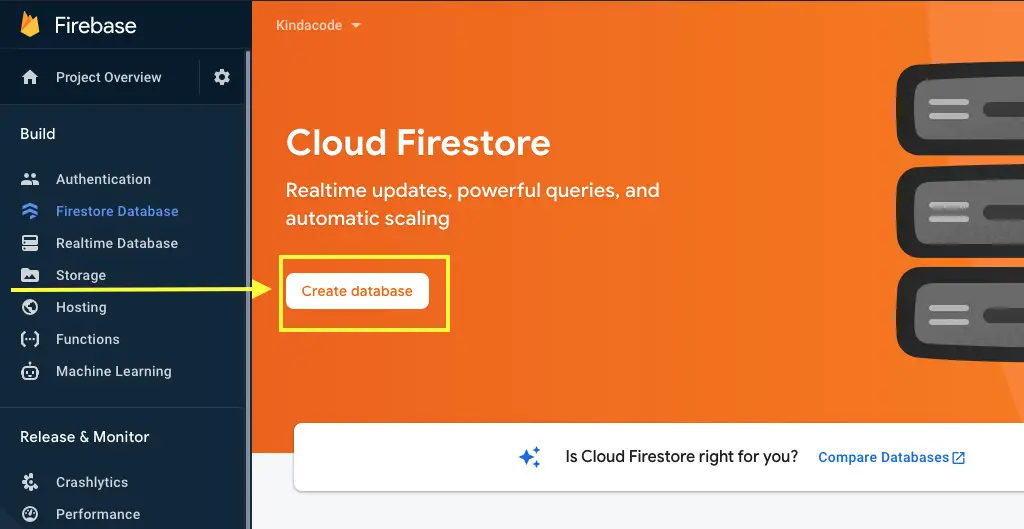
1. Go to your Firebase project’s dashboard, select “Build” > “Firestore Database” from the left sidebar, then click on the “Create database” button:
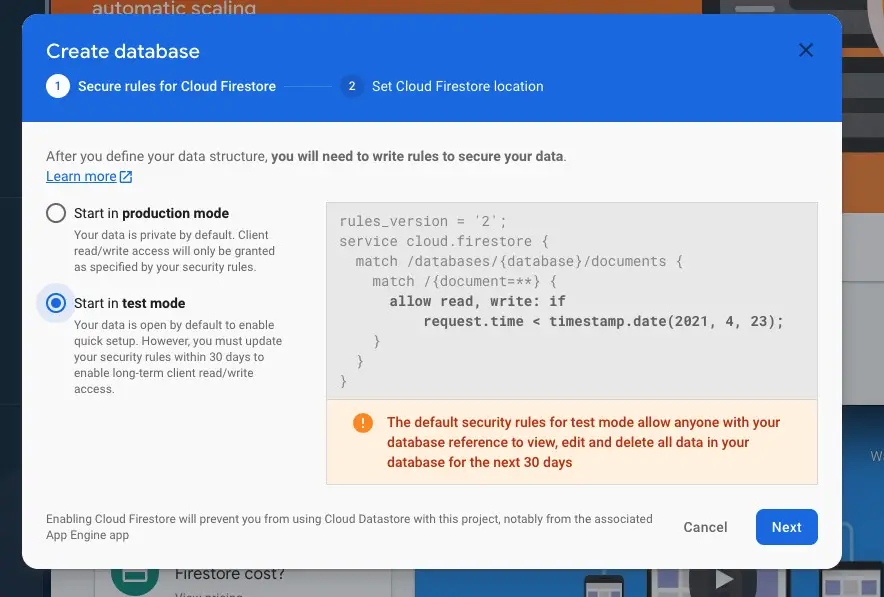
2. Select “Start in test mode” and then click on the “Next” button (you can change to “production mode” later if you want).
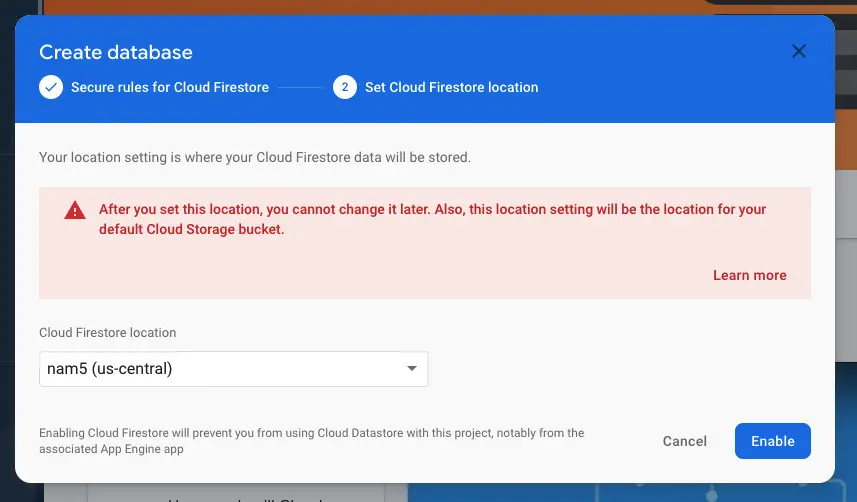
3. Select a location, then click the “Enable” button. The closer the location is, the lower the latency will be and the faster your app will function.
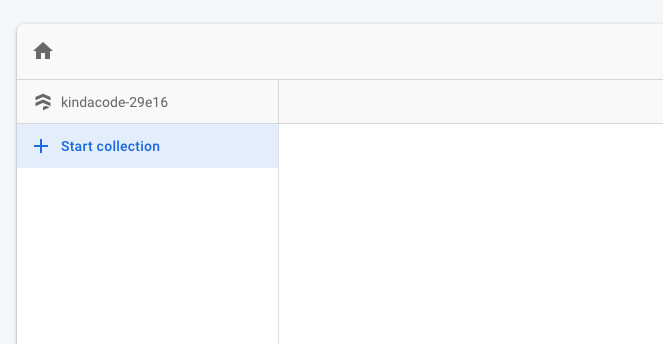
4. Click “+ Start Collection” to create a new collection.
5. Enter “products” and click “Next”.
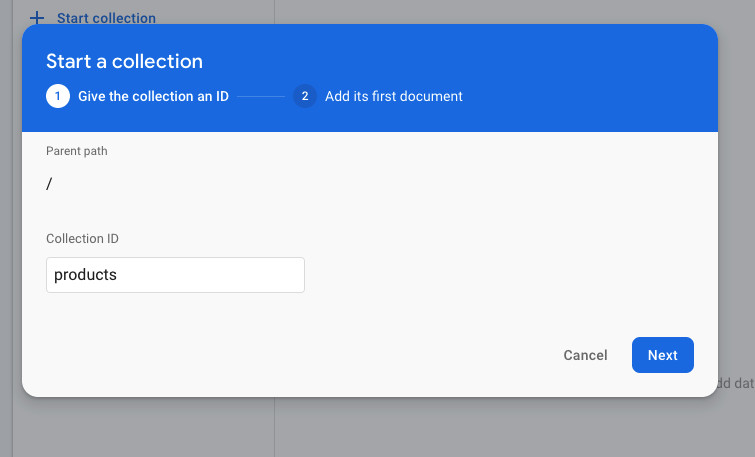
6. Add the first documents to our “products” collection. It has 2 fields: “name” (string) and “price” (number).
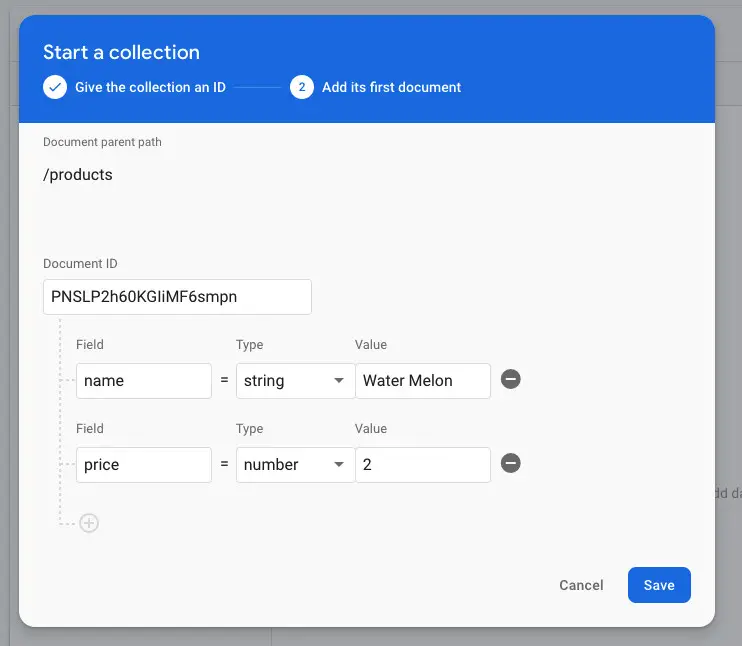
Fill in the fields, then click “Save”.
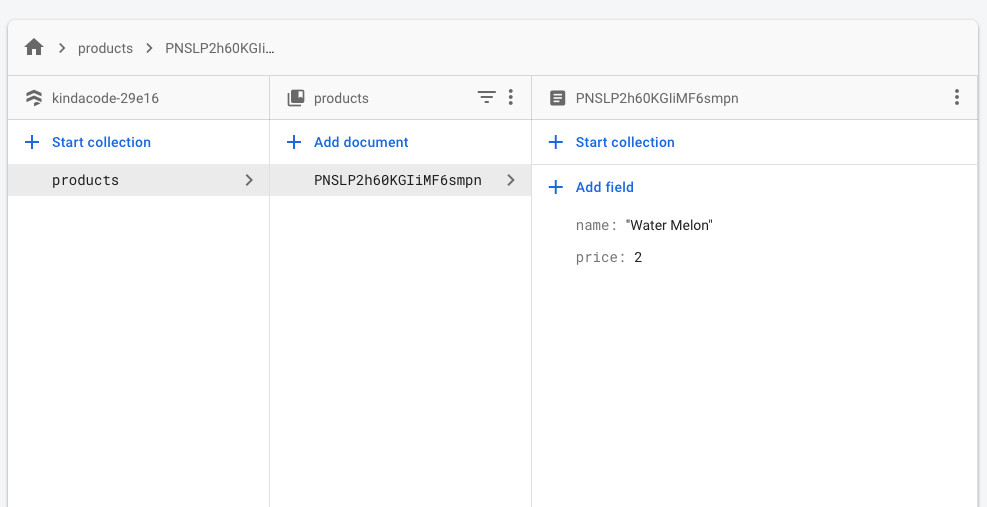
7. Now, we get a Firestore database ready to use.
Installing cloud_firestore
You can add cloud_firestore to your project by executing the command below:
flutter pub add cloud_firestoreThen execute this:
flutter pub getImport it into your Dart code:
import 'package:cloud_firestore/cloud_firestore.dart';The Full Code
The final code with explanations within the comments:
// main.dart
import 'package:flutter/material.dart';
import 'package:firebase_core/firebase_core.dart';
import 'package:cloud_firestore/cloud_firestore.dart';

void main() async {
  WidgetsFlutterBinding.ensureInitialized();
  await Firebase.initializeApp();
  runApp(const MyApp());
}

class MyApp extends StatelessWidget {
  const MyApp({Key? key}) : super(key: key);

  @override
  Widget build(BuildContext context) {
    return const MaterialApp(
      // Remove the debug banner
      debugShowCheckedModeBanner: false,
      title: 'Kindacode.com',
      home: HomePage(),
    );
  }
}

class HomePage extends StatefulWidget {
  const HomePage({Key? key}) : super(key: key);

  @override
  State<HomePage> createState() => _HomePageState();
}

class _HomePageState extends State<HomePage> {
  // text fields' controllers
  final TextEditingController _nameController = TextEditingController();
  final TextEditingController _priceController = TextEditingController();

  final CollectionReference _productss =
      FirebaseFirestore.instance.collection('products');

  // This function is triggered when the floatting button or one of the edit buttons is pressed
  // Adding a product if no documentSnapshot is passed
  // If documentSnapshot != null then update an existing product
  Future<void> _createOrUpdate([DocumentSnapshot? documentSnapshot]) async {
    String action = 'create';
    if (documentSnapshot != null) {
      action = 'update';
      _nameController.text = documentSnapshot['name'];
      _priceController.text = documentSnapshot['price'].toString();
    }

    await showModalBottomSheet(
        isScrollControlled: true,
        context: context,
        builder: (BuildContext ctx) {
          return Padding(
            padding: EdgeInsets.only(
                top: 20,
                left: 20,
                right: 20,
                // prevent the soft keyboard from covering text fields
                bottom: MediaQuery.of(ctx).viewInsets.bottom + 20),
            child: Column(
              mainAxisSize: MainAxisSize.min,
              crossAxisAlignment: CrossAxisAlignment.start,
              children: [
                TextField(
                  controller: _nameController,
                  decoration: const InputDecoration(labelText: 'Name'),
                ),
                TextField(
                  keyboardType:
                      const TextInputType.numberWithOptions(decimal: true),
                  controller: _priceController,
                  decoration: const InputDecoration(
                    labelText: 'Price',
                  ),
                ),
                const SizedBox(
                  height: 20,
                ),
                ElevatedButton(
                  child: Text(action == 'create' ? 'Create' : 'Update'),
                  onPressed: () async {
                    final String? name = _nameController.text;
                    final double? price =
                        double.tryParse(_priceController.text);
                    if (name != null && price != null) {
                      if (action == 'create') {
                        // Persist a new product to Firestore
                        await _productss.add({"name": name, "price": price});
                      }

                      if (action == 'update') {
                        // Update the product
                        await _productss
                            .doc(documentSnapshot!.id)
                            .update({"name": name, "price": price});
                      }

                      // Clear the text fields
                      _nameController.text = '';
                      _priceController.text = '';

                      // Hide the bottom sheet
                      Navigator.of(context).pop();
                    }
                  },
                )
              ],
            ),
          );
        });
  }

  // Deleteing a product by id
  Future<void> _deleteProduct(String productId) async {
    await _productss.doc(productId).delete();

    // Show a snackbar
    ScaffoldMessenger.of(context).showSnackBar(const SnackBar(
        content: Text('You have successfully deleted a product')));
  }

  @override
  Widget build(BuildContext context) {
    return Scaffold(
      appBar: AppBar(
        title: const Text('Kindacode.com'),
      ),
      // Using StreamBuilder to display all products from Firestore in real-time
      body: StreamBuilder(
        stream: _productss.snapshots(),
        builder: (context, AsyncSnapshot<QuerySnapshot> streamSnapshot) {
          if (streamSnapshot.hasData) {
            return ListView.builder(
              itemCount: streamSnapshot.data!.docs.length,
              itemBuilder: (context, index) {
                final DocumentSnapshot documentSnapshot =
                    streamSnapshot.data!.docs[index];
                return Card(
                  margin: const EdgeInsets.all(10),
                  child: ListTile(
                    title: Text(documentSnapshot['name']),
                    subtitle: Text(documentSnapshot['price'].toString()),
                    trailing: SizedBox(
                      width: 100,
                      child: Row(
                        children: [
                          // Press this button to edit a single product
                          IconButton(
                              icon: const Icon(Icons.edit),
                              onPressed: () =>
                                  _createOrUpdate(documentSnapshot)),
                          // This icon button is used to delete a single product
                          IconButton(
                              icon: const Icon(Icons.delete),
                              onPressed: () =>
                                  _deleteProduct(documentSnapshot.id)),
                        ],
                      ),
                    ),
                  ),
                );
              },
            );
          }

          return const Center(
            child: CircularProgressIndicator(),
          );
        },
      ),
      // Add new product
      floatingActionButton: FloatingActionButton(
        onPressed: () => _createOrUpdate(),
        child: const Icon(Icons.add),
      ),
    );
  }
}
A good way that many people have applied and succeeded is to copy the entire code above and paste it into the main.dart file, then edit or remove some lines of code and see what happens, and so on, so little by little.
Conclusion
We built a simple Flutter application that uses the Firestore database as a backend. You also learned how to perform the four most important tasks when working with a database: creating data, updating data, reading data, and deleting data. From now on, you can make more complicated and complex apps with that tech stack.
If you want to explore other interesting stuff about Flutter, take a look at the following articles:
- Flutter + Firebase Storage: Upload, Retrieve, and Delete files
- Flutter & SQLite: CRUD Example
- Using Provider for State Management in Flutter
- Using GetX (Get) for State Management in Flutter
- Flutter: Make a simple Color Picker from scratch
- Flutter: Check Internet Connection without any plugins
You can also check out our Flutter topic page or Dart topic page for the latest tutorials and examples.


