


This article walks you through a complete example of implementing a data table with pagination in Flutter. We’ll use a built-in widget named PaginatedDataTable and the DataTableSource class to get the matter done.
Table of Contents
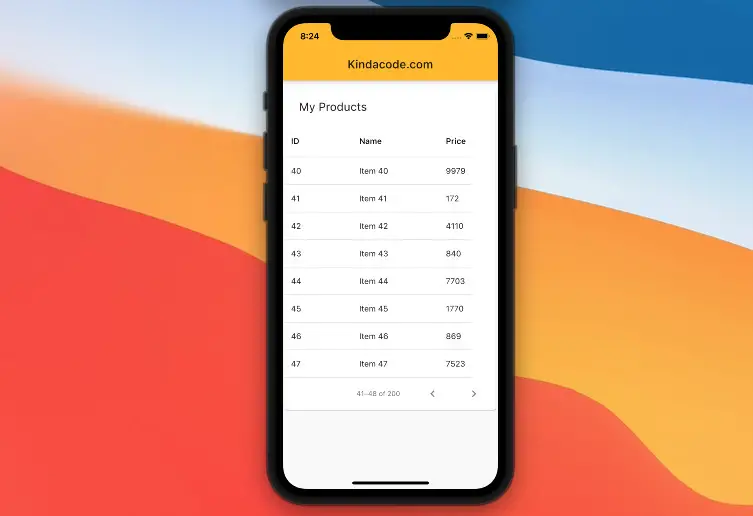
Example Preview
We will create an app that displays a list of imaginary products in a data table. Each page of the table will display 8 rows. Users can move between pages with the left chevron or right chevron icon.
The Code
The Steps
If you want to move fast and see the final code right now, skip this section and jump to the Complete Code section.
1. Generate a list of fiction products:
// Generate some made-up data
final List<Map<String, dynamic>> _data = List.generate(
      200,
      (index) => {
            "id": index,
            "title": "Item $index",
            "price": Random().nextInt(10000)
          });
2. Create the data source for the paginated data table by extending the DataTableSouce class:
// The "soruce" of the table
class MyData extends DataTableSource {
  // Generate some made-up data
  final List<Map<String, dynamic>> _data = List.generate(
      200,
      (index) => {
            "id": index,
            "title": "Item $index",
            "price": Random().nextInt(10000)
          });

  @override
  bool get isRowCountApproximate => false;
  @override
  int get rowCount => _data.length;
  @override
  int get selectedRowCount => 0;
  @override
  DataRow getRow(int index) {
    return DataRow(cells: [
      DataCell(Text(_data[index]['id'].toString())),
      DataCell(Text(_data[index]["title"])),
      DataCell(Text(_data[index]["price"].toString())),
    ]);
  }
}
3. Implement the data table with the PaginatedDataTable widget:
 PaginatedDataTable(
            source: _data,
            header: const Text('My Products'),
            columns: const [
              DataColumn(label: Text('ID')),
              DataColumn(label: Text('Name')),
              DataColumn(label: Text('Price'))
            ],
            columnSpacing: 100,
            horizontalMargin: 10,
            rowsPerPage: 8,
            showCheckboxColumn: false,
          ),
The Complete Code
Create a new Flutter project, clear everything in your main.dart then add the following:
// main.dart
import 'package:flutter/material.dart';
import 'dart:math';

void main() {
  runApp(const MyApp());
}

class MyApp extends StatelessWidget {
  const MyApp({Key? key}) : super(key: key);

  @override
  Widget build(BuildContext context) {
    return MaterialApp(
        // Hide the debug banner
        debugShowCheckedModeBanner: false,
        title: 'Kindacode.com',
        theme: ThemeData(
          primarySwatch: Colors.amber,
        ),
        home: const HomeScreen());
  }
}

class HomeScreen extends StatefulWidget {
  const HomeScreen({Key? key}) : super(key: key);

  @override
  State<HomeScreen> createState() => _HomeScreenState();
}

class _HomeScreenState extends State<HomeScreen> {
  final DataTableSource _data = MyData();

  @override
  Widget build(BuildContext context) {
    return Scaffold(
      appBar: AppBar(
        title: const Text('Kindacode.com'),
      ),
      body: Column(
        children: [
          const SizedBox(
            height: 10,
          ),
          PaginatedDataTable(
            source: _data,
            header: const Text('My Products'),
            columns: const [
              DataColumn(label: Text('ID')),
              DataColumn(label: Text('Name')),
              DataColumn(label: Text('Price'))
            ],
            columnSpacing: 100,
            horizontalMargin: 10,
            rowsPerPage: 8,
            showCheckboxColumn: false,
          ),
        ],
      ),
    );
  }
}

// The "soruce" of the table
class MyData extends DataTableSource {
  // Generate some made-up data
  final List<Map<String, dynamic>> _data = List.generate(
      200,
      (index) => {
            "id": index,
            "title": "Item $index",
            "price": Random().nextInt(10000)
          });

  @override
  bool get isRowCountApproximate => false;
  @override
  int get rowCount => _data.length;
  @override
  int get selectedRowCount => 0;
  @override
  DataRow getRow(int index) {
    return DataRow(cells: [
      DataCell(Text(_data[index]['id'].toString())),
      DataCell(Text(_data[index]["title"])),
      DataCell(Text(_data[index]["price"].toString())),
    ]);
  }
}Note: You can reorganize the code to make it better. A good practice is to place each class in a single file. For simplicity’s sake, I put everything in the main.dart file.
Final Words
To make the example clean and easy to follow, I used some made-up data. However, in the vast majority of cases in real life, you will need to get data by sending http requests to a remote API or reading from local storage. If you are not familiar with this task, take a look at these articles:
- Ways to fetch data from APIs in Flutter
- How to read data from local JSON files in Flutter
- Flutter and Firestore Database: CRUD example
- 4 Ways to Store Data Offline in Flutter
- How to implement FutureBuilder in Flutter
- Flutter StreamBuilder examples
You can learn more about tables in Flutter in the following:
Flutter is awesome, and there are many interesting things to learn. You can also take a tour around our Flutter topic page, or Dart topic page for the latest tutorials and examples.


