When developing apps with Flutter, there might be cases where you want to show a context menu when your user long presses on an element. The location of the context menu will be near the press location, as a reasonable thing. This practical article shows you the technique to get it done and then walks you through a complete example of applying that technique in practice.
Table of Contents
What Is The Point?
To detect long press on an image or other kind of widget, wrap it with the GestureDetector widget, like so:
GestureDetector(
              // get tap location
              onTapDown: (details) => _getTapPosition(details),
              // show the context menu
              onLongPress: () => _showContextMenu(context),
              child: Image.network(/* ... */),
),
In the code snippet above, the _getTapPosition is used to retain the tap location (where the user’s finger hits the screen). In Flutter, we can obtain the tap position like so:
void _getTapPosition(TapDownDetails details) {
    final RenderBox referenceBox = context.findRenderObject() as RenderBox;
    final tapPosition = referenceBox.globalToLocal(details.globalPosition);
}
The _showContextMenu function, as its name self describes, is used to show the context menu. In Flutter, there is a built-in function named showMenu can help us do the job:
void _showContextMenu(BuildContext context) async {
    final result = await showMenu(
        context: context,

        // Position the context menu
        // It should be placed near the long press location
        position: /* ...*/,

        // set a list of choices for the context menu
        items: [/* ... */]);
}
For more clarity, see the working example below.
Example
App Overview
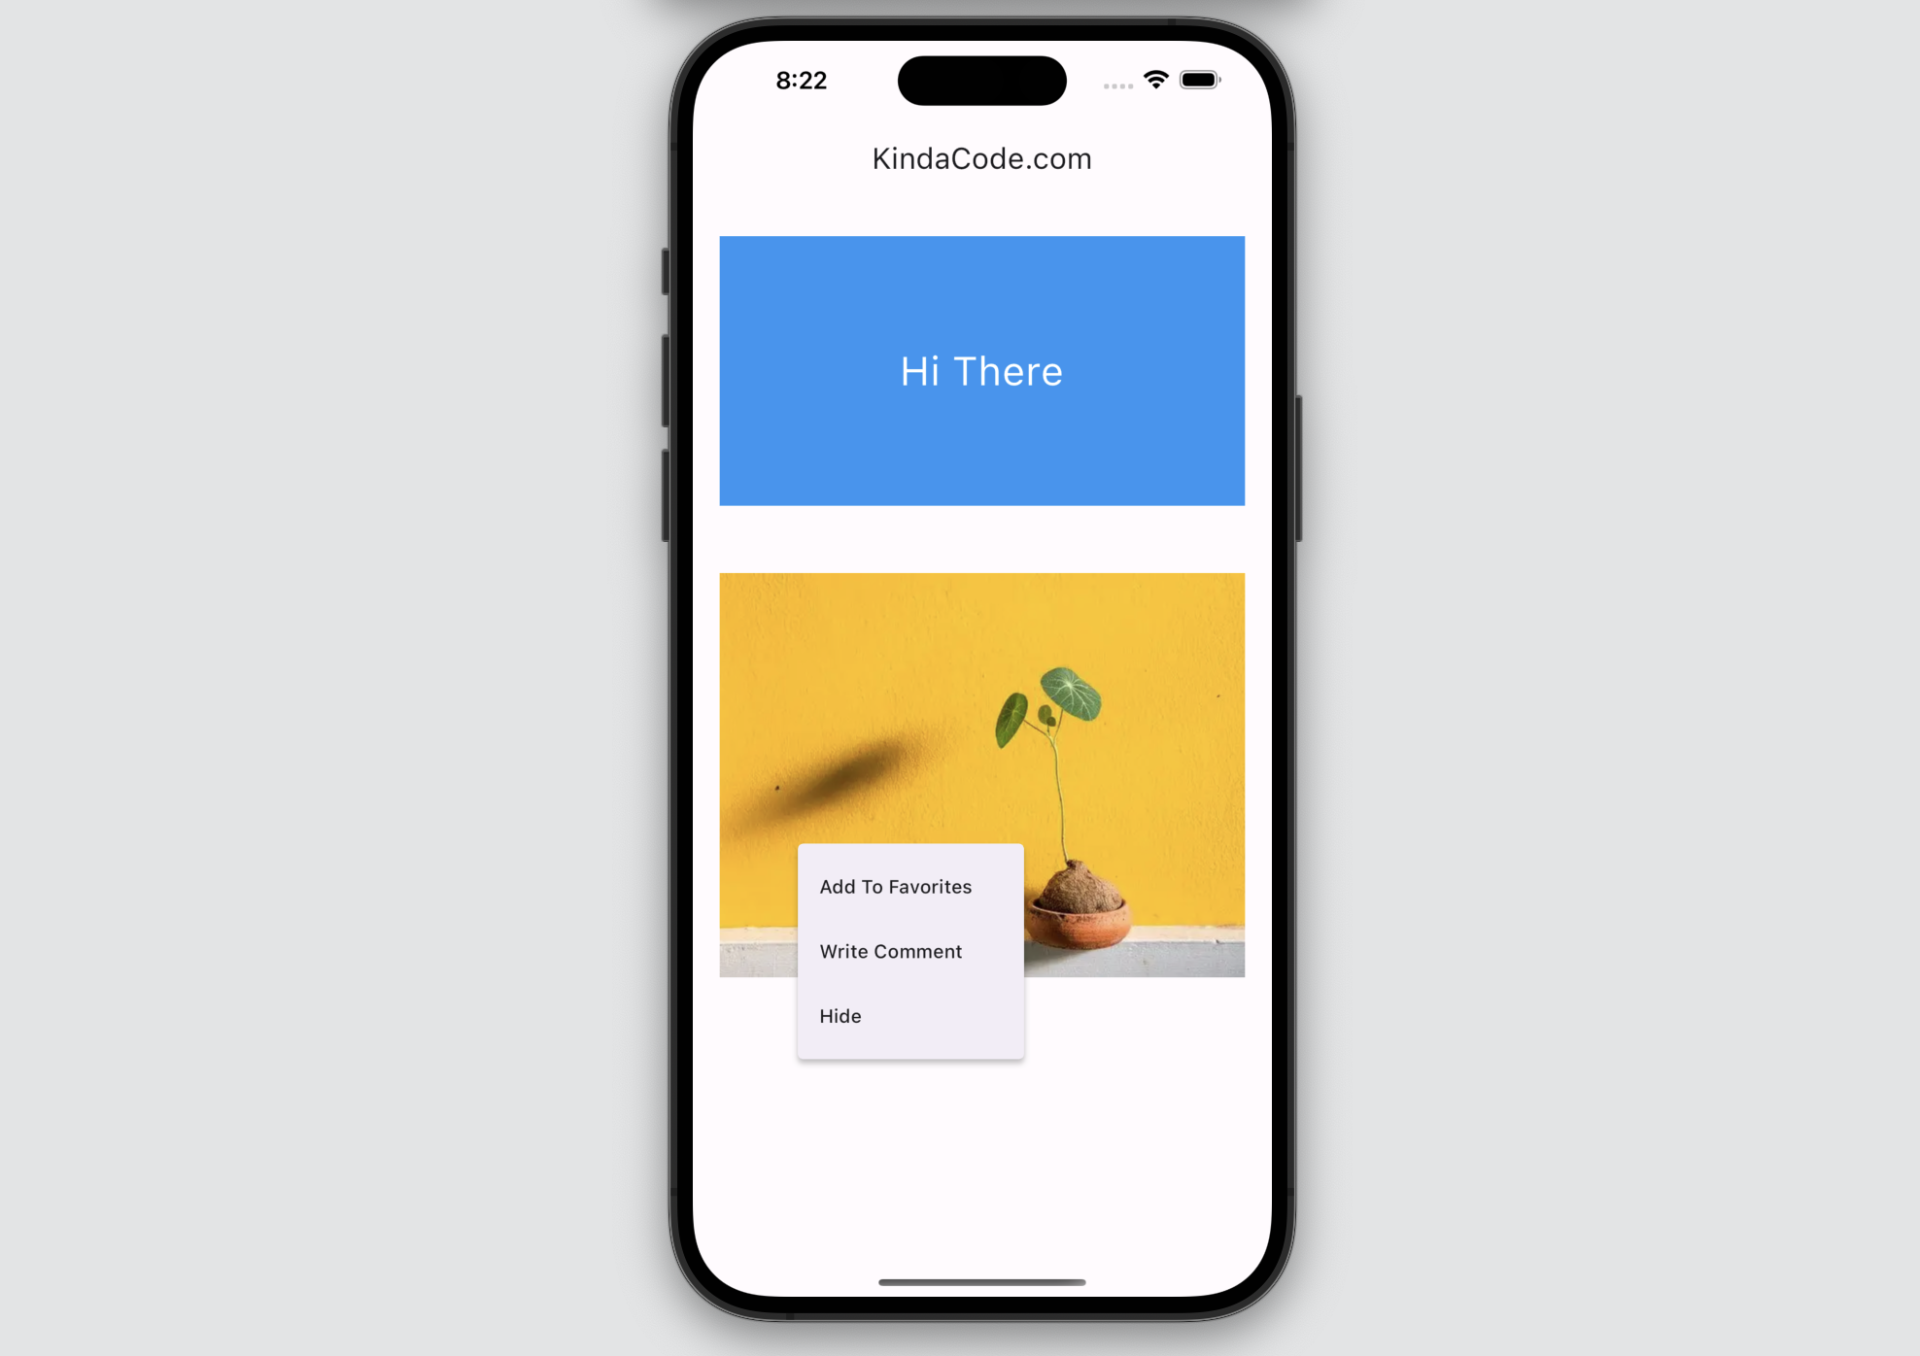
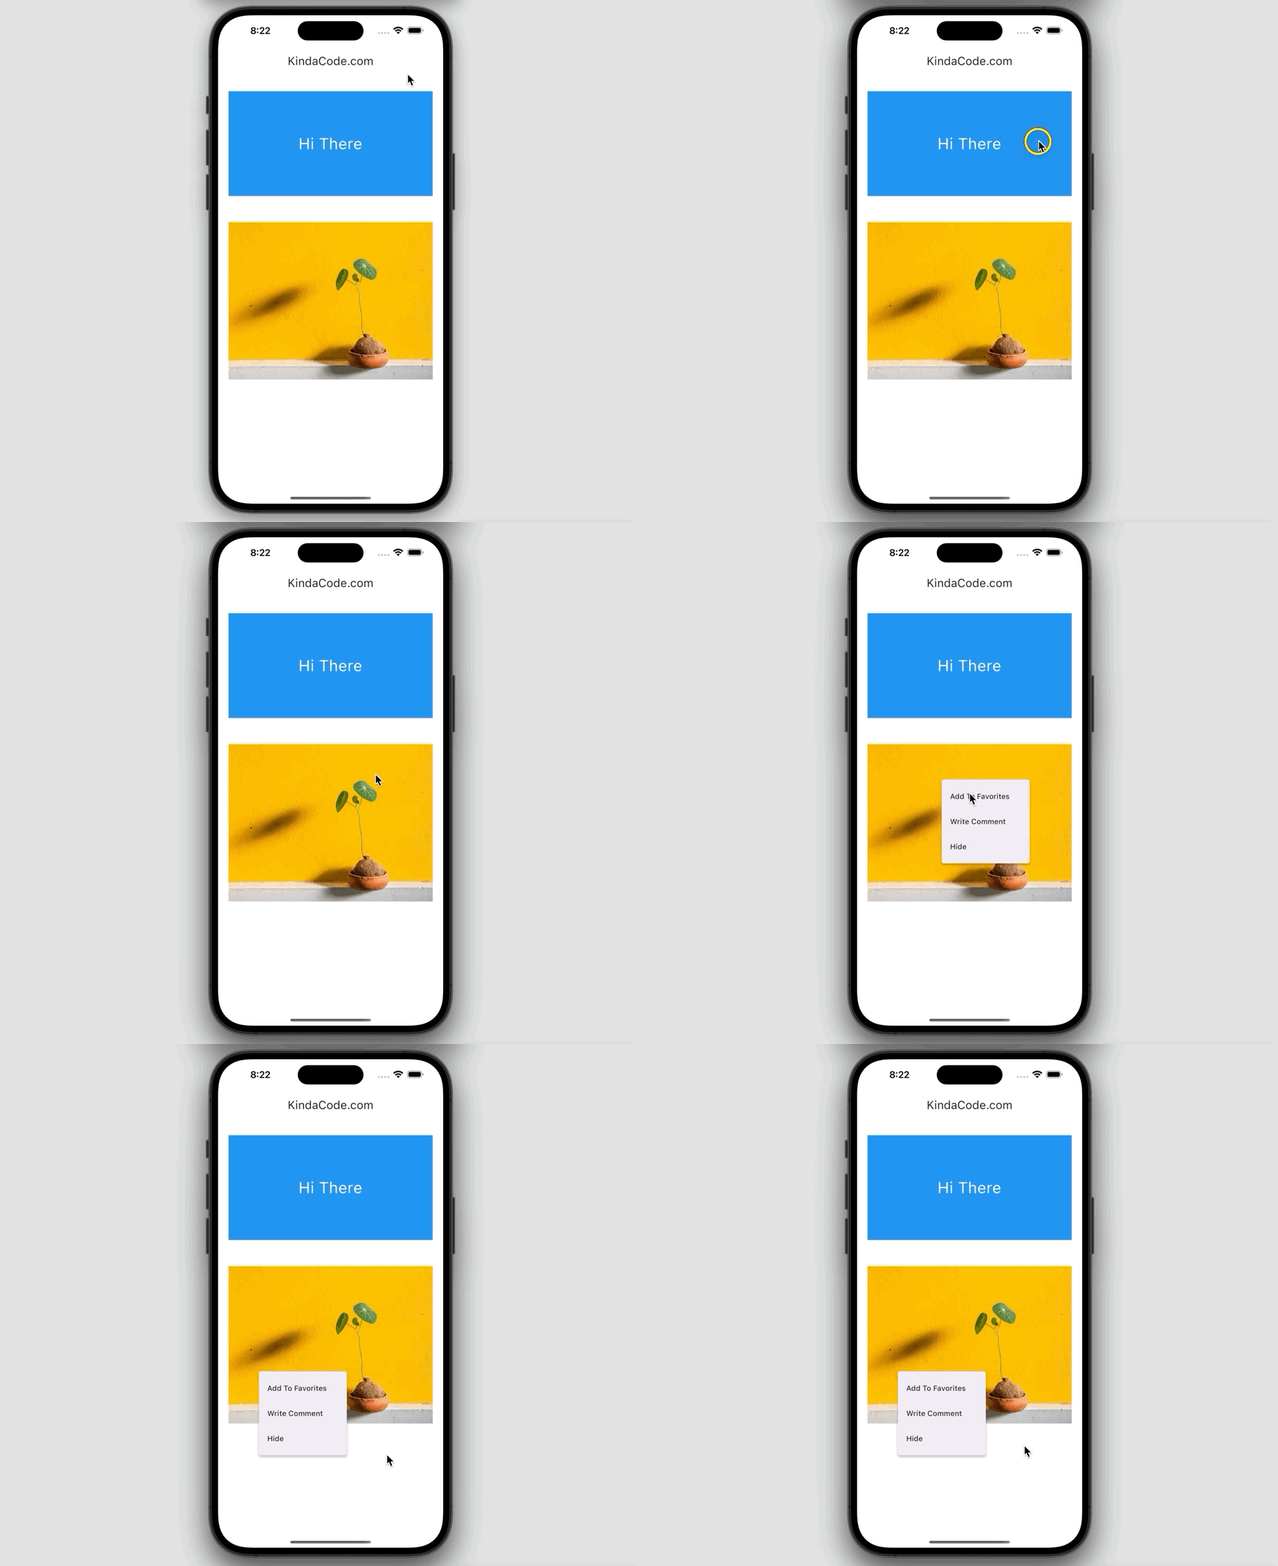
The sample we’re going to make presents a blue box and an image. When either the box or the image gets a long press, a context menu with 3 options will appear (Add to Favorites, Write Comment, and Hide). The selected option will be printed out (to the terminal). To dismiss the context menu, just tap somewhere outside of it.
If you look closely, you’ll notice that the context menu appears where the long press action takes place but never trespasses on the border of the screen. Here’s the demo:
The Code
The full source code in main.dart with explanations (useMaterial3 is enabled):
// main.dart
import 'package:flutter/material.dart';

void main() {
  runApp(const MyApp());
}

class MyApp extends StatelessWidget {
  const MyApp({Key? key}) : super(key: key);

  @override
  Widget build(BuildContext context) {
    return MaterialApp(
      // Remove the debug banner
      debugShowCheckedModeBanner: false,
      title: 'KindaCode.com',
      theme: ThemeData(useMaterial3: true),
      home: const KindaCodeDemo(),
    );
  }
}

class KindaCodeDemo extends StatefulWidget {
  const KindaCodeDemo({Key? key}) : super(key: key);

  @override
  State<KindaCodeDemo> createState() => _KindaCodeDemoState();
}

class _KindaCodeDemoState extends State<KindaCodeDemo> {
  // Tap location will be used use to position the context menu
  Offset _tapPosition = Offset.zero;
  void _getTapPosition(TapDownDetails details) {
    final RenderBox referenceBox = context.findRenderObject() as RenderBox;
    setState(() {
      _tapPosition = referenceBox.globalToLocal(details.globalPosition);
    });
  }

  // This function will be called when you long press on the blue box or the image
  void _showContextMenu(BuildContext context) async {
    final RenderObject? overlay =
        Overlay.of(context)?.context.findRenderObject();

    final result = await showMenu(
        context: context,

        // Show the context menu at the tap location
        position: RelativeRect.fromRect(
            Rect.fromLTWH(_tapPosition.dx, _tapPosition.dy, 30, 30),
            Rect.fromLTWH(0, 0, overlay!.paintBounds.size.width,
                overlay.paintBounds.size.height)),

        // set a list of choices for the context menu
        items: [
          const PopupMenuItem(
            value: 'favorites',
            child: Text('Add To Favorites'),
          ),
          const PopupMenuItem(
            value: 'comment',
            child: Text('Write Comment'),
          ),
          const PopupMenuItem(
            value: 'hide',
            child: Text('Hide'),
          ),
        ]);

    // Implement the logic for each choice here
    switch (result) {
      case 'favorites':
        debugPrint('Add To Favorites');
        break;
      case 'comment':
        debugPrint('Write Comment');
        break;
      case 'hide':
        debugPrint('Hide');
        break;
    }
  }

  @override
  Widget build(BuildContext context) {
    return Scaffold(
      appBar: AppBar(title: const Text('KindaCode.com')),
      body: Padding(
        padding: const EdgeInsets.symmetric(vertical: 30, horizontal: 20),
        child: Column(
          children: [
            GestureDetector(
              // get tap location
              onTapDown: (details) => _getTapPosition(details),
              // show the context menu
              onLongPress: () => _showContextMenu(context),
              child: Container(
                width: double.infinity,
                height: 200,
                color: Colors.blue,
                child: const Center(
                  child: Text(
                    'Hi There',
                    style: TextStyle(fontSize: 30, color: Colors.white),
                  ),
                ),
              ),
            ),
            const SizedBox(
              height: 50,
            ),
            GestureDetector(
              // get tap location
              onTapDown: (details) => _getTapPosition(details),
              // show the context menu
              onLongPress: () => _showContextMenu(context),
              child: Image.network(
                  'https://www.kindacode.com/wp-content/uploads/2022/07/plant-example.jpeg',
                  width: double.infinity,
                  height: 300,
                  fit: BoxFit.cover),
            ),
          ],
        ),
      ),
    );
  }
}
Conclusion
You’ve learned how to show a popup context menu when a widget takes a long press. You’ve also learned how to arrange the context menu in a sensible place. To explore more new and exciting stuff about modern Flutter, take a look at the following articles:
- Flutter: PopupMenuButton example
- Flutter: Cupertino ContextMenu example
- Flutter: Making a Dropdown Multiselect with Checkboxes
- TabBar, TabBarView, and TabPageSelector in Flutter
- Flutter: Creating a Fullscreen Modal with Search Form
- Flutter and Firestore Database: CRUD example
You can also tour around our Flutter topic page or Dart topic page for the most recent tutorials and examples.

