This practical, example-centric article shows you how to create a countdown timer app in Flutter. We’ll write code from scratch without using any third-party libraries.
Overview
About Countdown Timers
A countdown timer can be a standalone app or a part of a bigger app. It allows users to set a specific time limit and track the time remaining. It can be used for a variety of purposes, such as:
- Countdown timers can be used to set time limits for tasks, such as study sessions or work periods, helping users to stay focused and avoid distractions.
- FCountdown timers can be used to time workouts, rest periods, and other intervals during exercise routines.
- Games: Countdown timers can be used in games to add an element of time pressure and increase the level of challenge.
Prerequisites
To get the most out of this article, you should have the followings:
- Basic knowledge about the Timer class in Flutter. If not, you can see this detailed guide: Working with Timer and Timer.periodic in Flutter.
- Some knowledge about the Slider widget. If not, check out this detailed tutorial Flutter Slider: Tutorial & Example.
- Some basic understanding of the ElevatedButton widget. Here’s the detailed guide: Working with ElevatedButton in Flutter.
If you’re ready, let’s get started.
Complete Example
Preview
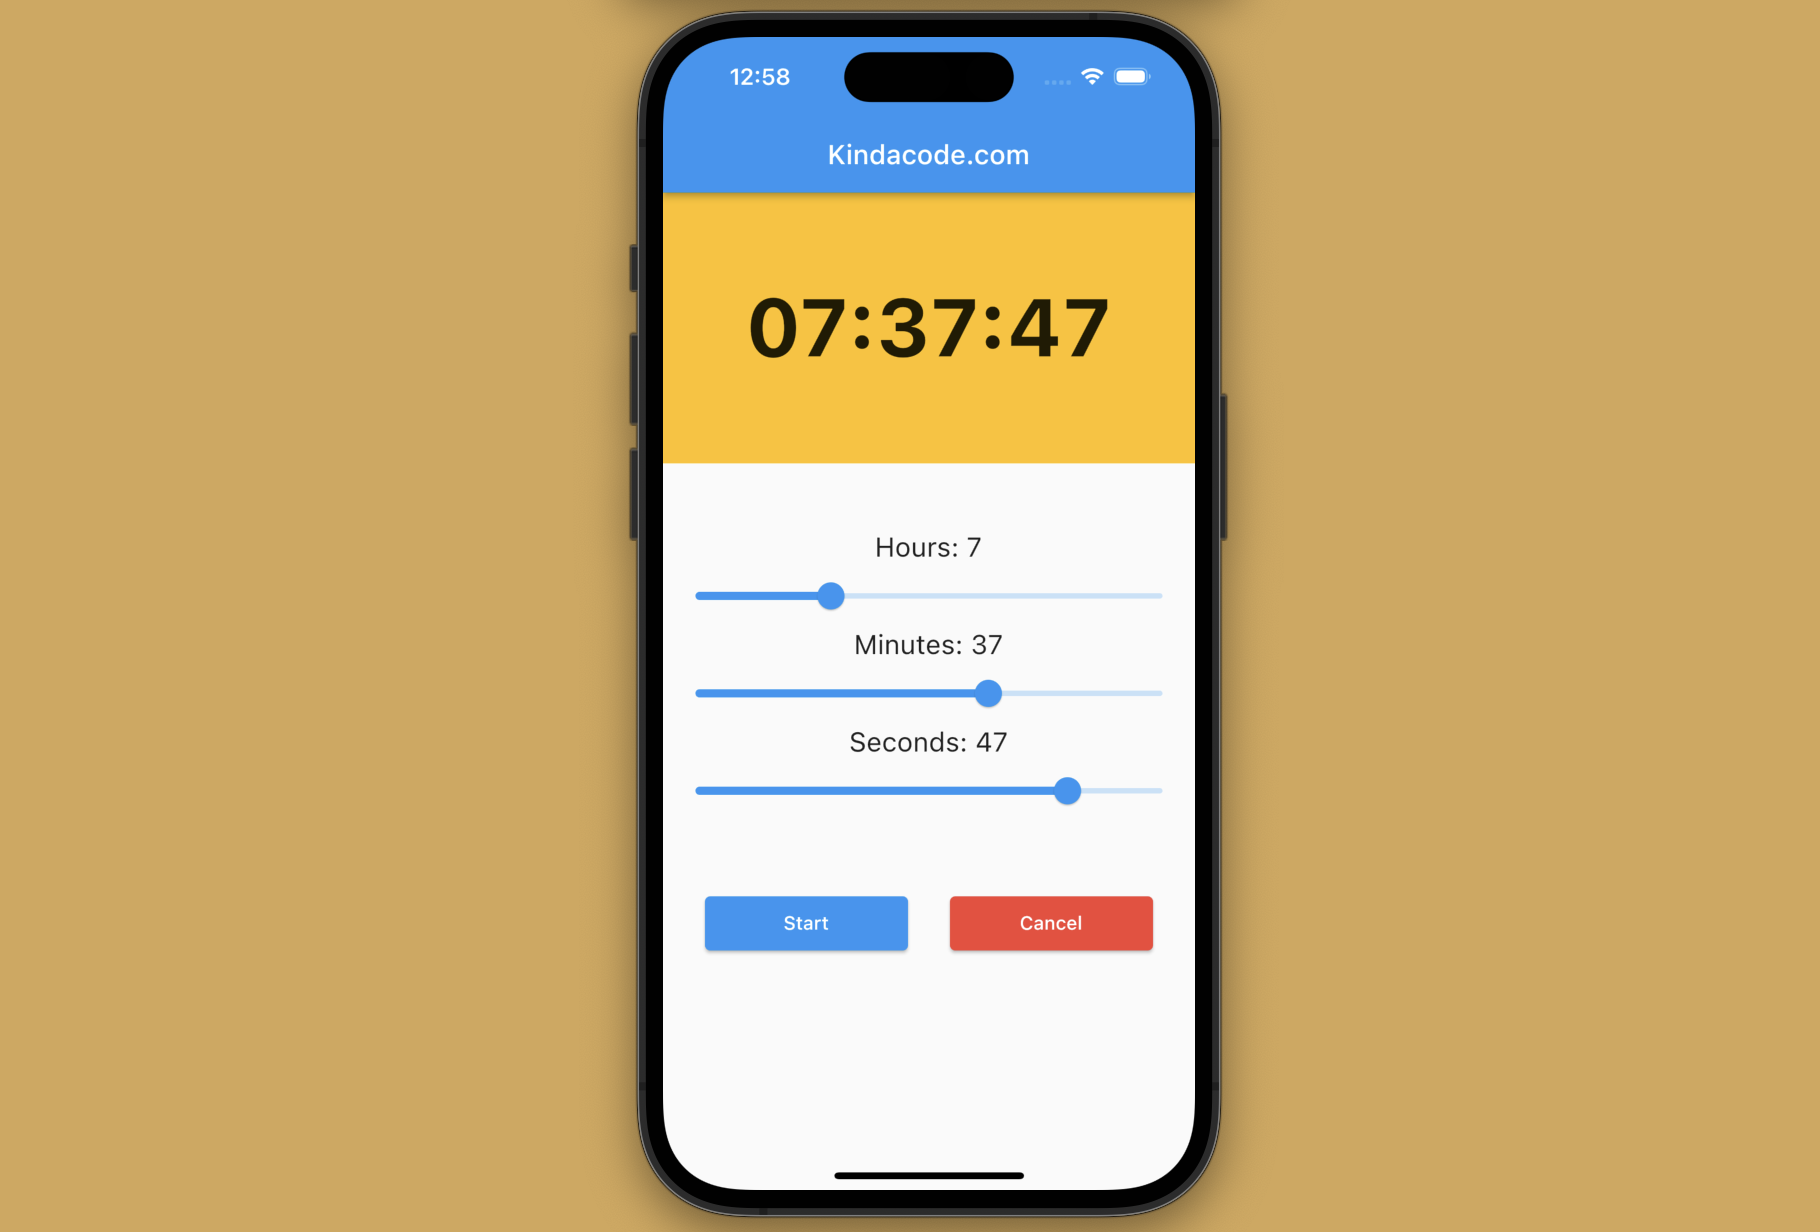
The countdown timer app we’re going to make has 3 main sections:
- A big Text widget that displays the reaming time in the HH:mm:ss format
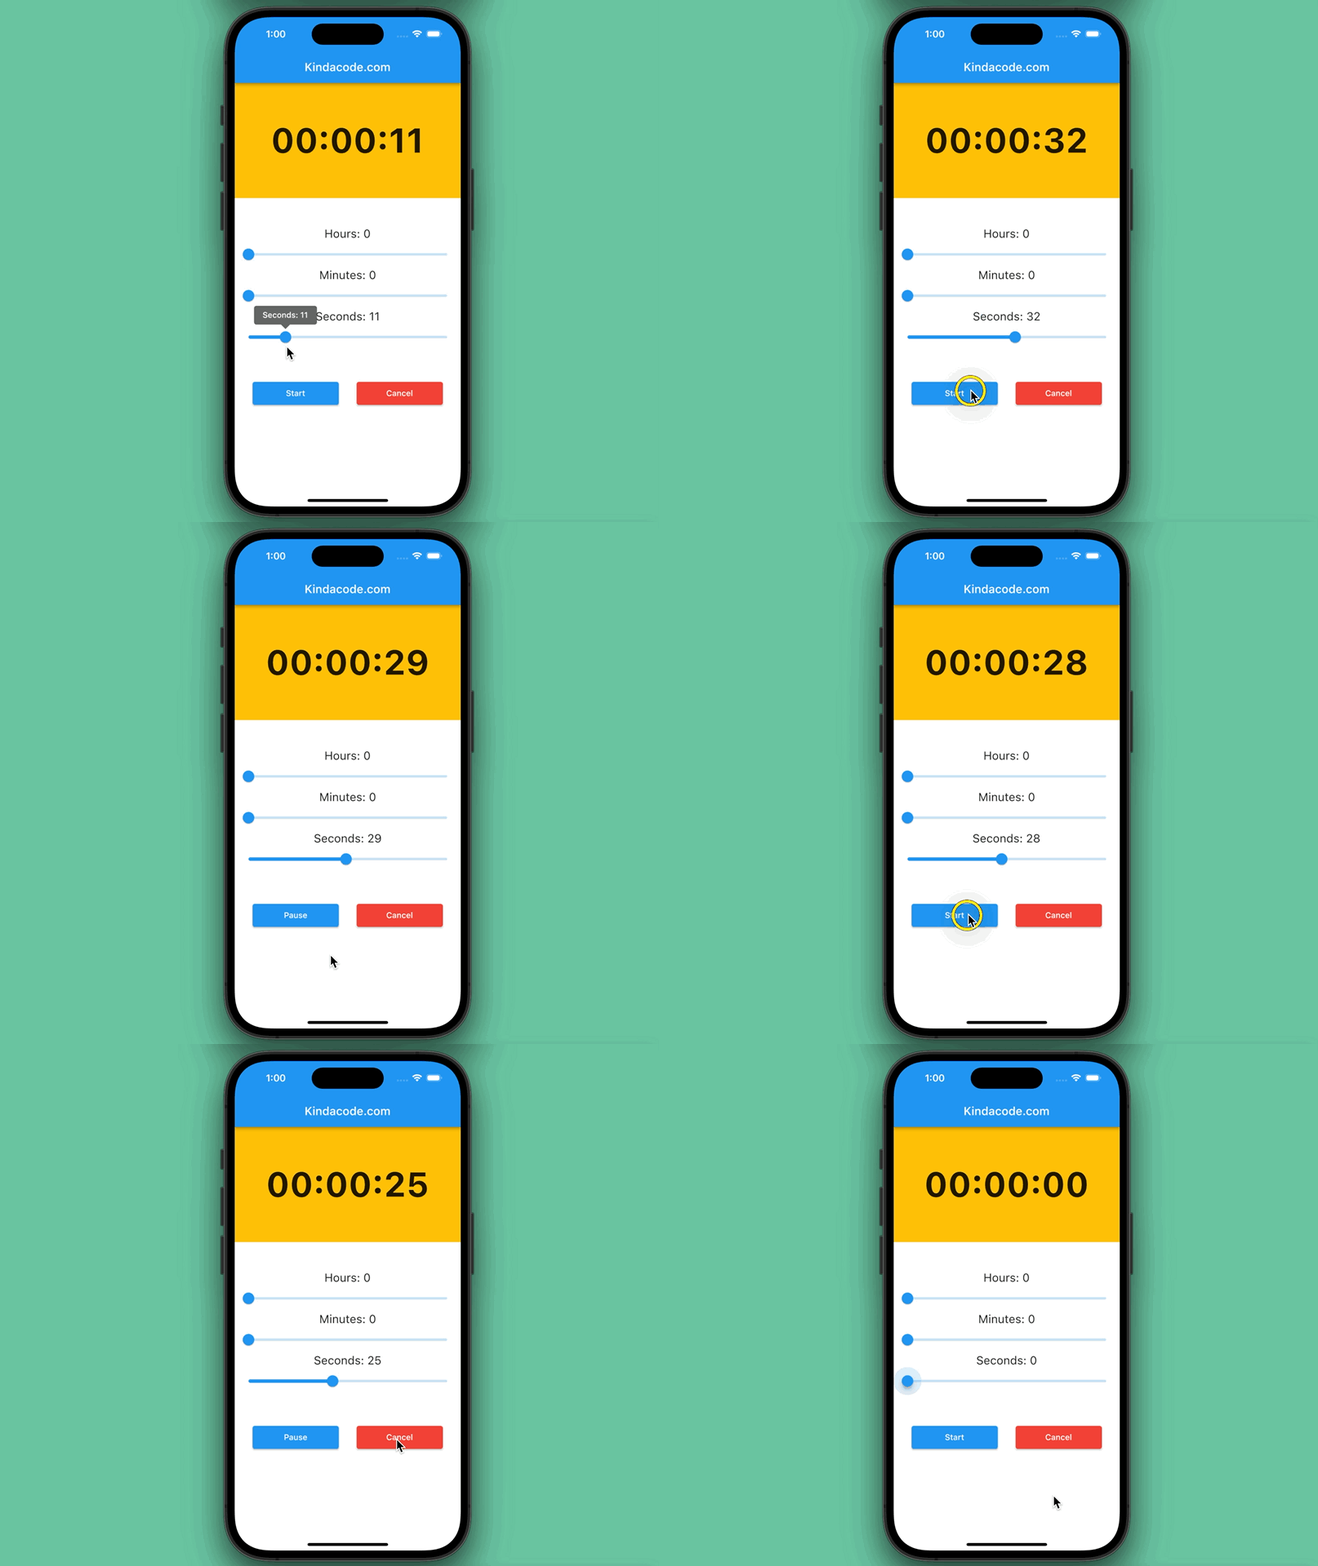
- 3 Slider widgets that let the user select hours (from 0 to 24), minutes (from 0 to 59), and seconds (from 0 to 59). The values of these sliders will automatically reduce when the countdown is running.
- 2 buttons: The blue one is used to start/pause the timer. The red one is used to cancel the timer.
Here’s how it works in action:

You can replace the sliders with text fields or some kind of pickers if you want. The available solutions vary widely.
The Code
Here’s the entire code, along with comentaries explaining what each block does. You can copy and paste it into your main.dart file and run it to see the results:
// Kindacode.com
// main.dart
import 'package:flutter/material.dart';
import 'dart:async';

void main() {
  runApp(const MyApp());
}

class MyApp extends StatelessWidget {
  const MyApp({super.key});

  @override
  Widget build(BuildContext context) {
    return MaterialApp(
      // Remove the debug banner
      debugShowCheckedModeBanner: false,
      title: 'KindaCode.com',
      theme: ThemeData(
        primarySwatch: Colors.blue,
      ),
      home: const KindaCodeDemo(),
    );
  }
}

class KindaCodeDemo extends StatefulWidget {
  const KindaCodeDemo({super.key});

  @override
  State<KindaCodeDemo> createState() => _KindaCodeDemoState();
}

class _KindaCodeDemoState extends State<KindaCodeDemo> {
  // The seconds, minutes and hours
  int _seconds = 0;
  int _minutes = 0;
  int _hours = 0;

  // The state of the timer (running or not)
  bool _isRunning = false;

  // The timer
  Timer? _timer;

  // This function will be called when the user presses the start button
  // Start the timer
  // The timer will run every second
  // The timer will stop when the hours, minutes and seconds are all 0
  void _startTimer() {
    setState(() {
      _isRunning = true;
    });
    _timer = Timer.periodic(const Duration(seconds: 1), (timer) {
      setState(() {
        if (_seconds > 0) {
          _seconds--;
        } else {
          if (_minutes > 0) {
            _minutes--;
            _seconds = 59;
          } else {
            if (_hours > 0) {
              _hours--;
              _minutes = 59;
              _seconds = 59;
            } else {
              _isRunning = false;
              _timer?.cancel();
            }
          }
        }
      });
    });
  }

  // This function will be called when the user presses the pause button
  // Pause the timer
  void _pauseTimer() {
    setState(() {
      _isRunning = false;
    });
    _timer?.cancel();
  }

  // This function will be called when the user presses the cancel button
  // Cancel the timer
  void _cancelTimer() {
    setState(() {
      _hours = 0;
      _minutes = 0;
      _seconds = 0;
      _isRunning = false;
    });
    _timer?.cancel();
  }

  @override
  Widget build(BuildContext context) {
    return Scaffold(
      appBar: AppBar(
        title: const Text('Kindacode.com'),
      ),
      body: Center(
        child: Column(
          mainAxisAlignment: MainAxisAlignment.start,
          children: [
            // Display remaining time in HH:MM:SS format
            Container(
              width: double.infinity,
              height: 200,
              color: Colors.amber,
              child: Center(
                child: Text(
                  '${_hours.toString().padLeft(2, '0')}:${_minutes.toString().padLeft(2, '0')}:${_seconds.toString().padLeft(2, '0')}',
                  style: const TextStyle(
                      fontSize: 60, fontWeight: FontWeight.bold),
                ),
              ),
            ),
            const SizedBox(height: 50),
            // The 3 sliders to set hours, minutes and seconds
            Column(
              mainAxisSize: MainAxisSize.min,
              crossAxisAlignment: CrossAxisAlignment.center,
              children: [
                // The hours slider and its heading text
                Text('Hours: $_hours', style: const TextStyle(fontSize: 20)),
                Slider(
                  value: _hours.toDouble(),
                  min: 0,
                  max: 24,
                  onChanged: (value) {
                    if (!_isRunning) {
                      setState(() {
                        _hours = value.toInt();
                      });
                    }
                  },
                  divisions: 100,
                  label: 'Hours: $_hours',
                ),
                // The minutes slider and its heading text
                Text('Minutes: $_minutes',
                    style: const TextStyle(fontSize: 20)),
                Slider(
                  value: _minutes.toDouble(),
                  min: 0,
                  max: 59,
                  onChanged: (value) {
                    if (!_isRunning) {
                      setState(() {
                        _minutes = value.toInt();
                      });
                    }
                  },
                  divisions: 59,
                  label: 'Minutes: $_minutes',
                ),
                // The seconds slider and its heading text
                Text('Seconds: $_seconds',
                    style: const TextStyle(fontSize: 20)),
                Slider(
                  value: _seconds.toDouble(),
                  min: 0,
                  max: 59,
                  onChanged: (value) {
                    if (!_isRunning) {
                      setState(() {
                        _seconds = value.toInt();
                      });
                    }
                  },
                  divisions: 59,
                  label: 'Seconds: $_seconds',
                ),
              ],
            ),
            const SizedBox(height: 50),
            // The start/pause and cancel buttons
            Row(
              mainAxisAlignment: MainAxisAlignment.spaceEvenly,
              children: [
                // The start/pause button
                // The text on the button changes based on the state (_isRunning)
                ElevatedButton(
                  onPressed: () {
                    if (_isRunning) {
                      _pauseTimer();
                    } else {
                      _startTimer();
                    }
                  },
                  style:
                      ElevatedButton.styleFrom(fixedSize: const Size(150, 40)),
                  child: _isRunning ? const Text('Pause') : const Text('Start'),
                ),
                // The cancel button
                ElevatedButton(
                  onPressed: _cancelTimer,
                  style: ElevatedButton.styleFrom(
                      backgroundColor: Colors.red,
                      fixedSize: const Size(150, 40)),
                  child: const Text('Cancel'),
                ),
              ],
            ),
          ],
        ),
      ),
    );
  }

  // Cancel the timer when the widget is disposed
  @override
  void dispose() {
    if (_timer != null) {
      _timer!.cancel();
    }
    super.dispose();
  }
}
The code is long, but, believe me, you will deeply understand it sooner or later.
See also: Flutter: 2 Ways to Create an Onboarding Flow (Intro Slider)
Conclusion
Congratulations! You made it, a professional countdown timer app. You can improve it as needed, such as polishing the buttons, changing colors, changing the sizes and rearranging the positions of elements, etc.
If you’re not tired yet, continue your journey in the realm of Flutter by taking a look at the following articles:
- How to Create a Stopwatch in Flutter
- How to Create a Sortable ListView in Flutter
- Flutter StreamBuilder: Tutorial & Examples (Updated)
- Flutter Stream.periodic: Tutorial & Example
- How to implement a Date Range Picker in Flutter
- Working with Cupertino Date Picker in Flutter
You can also tour around our Flutter topic page or Dart topic page for the most recent tutorials and examples.


