In this article, we will explore how to retrieve information about the platform your React Native is running on. This information includes OS, OS version, and many more helpful things. At first, we will have a look at the Platform API then we will examine a complete example of using it in practice. Without any further ado, let’s get started.
Table of Contents
Overview
To use Platform, we need to import it into our code:
import { Platform } from 'react-native';Platform returns an object with several constants. You can simply use it as follows:
console.log(Platform.OS);This table lists the most used properties:
| Property | Type | Description |
|---|---|---|
| OS | enum(‘android’, ‘ios’) | Determines whether the current OS is Android or iOS |
| Version | number (on Android), string (on iOS) | Returns the version of the OS |
| isTV | boolean | Determines whether the device is a TV or not |
| isIpad | boolean | Determines whether the device is an iPad or not |
| constants | object | An object which contains some detailed information about the platform |
| isTesting | boolean | Determines whether the app is in development mode with a testing flat set |
These are some useful properties of the Platform.constants object:
- Serial (Android-only): The hardware serial number of the device
- Model (Android-only): The end-user name of the device
- Manufacture (Android-only): The company that makes the device
- Brand (Android-only): The brand of the device
- uiMode (Android-only): This can be ‘car’, ‘desk’, ‘normal’, ‘tv’, ‘watch’, and ‘unknown’.
- interfaceIdiom (iOS-only): The interface type for the device.
- rectNativeVersion: Helps you programmatically retrieve the information about the version of React Native is being used.
The Complete Example
App Preview
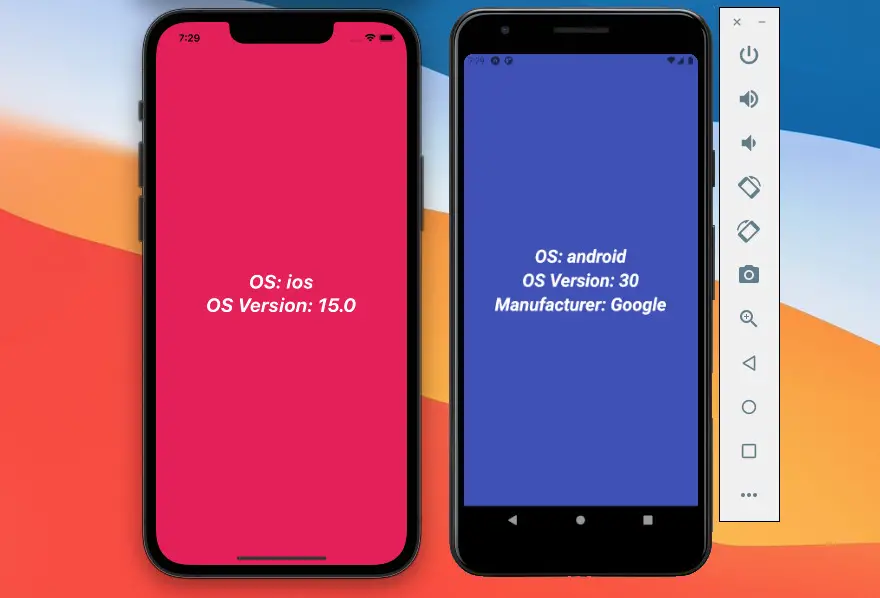
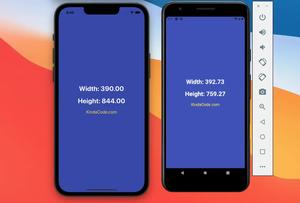
The sample app we are going to build not only displays the OS name, and OS version but also has a different background color on iOS and Android:
The Final Code
The full source code with explanations in App.js:
// App.js
import React, { useState, useEffect } from "react";
import { Platform, Text, StyleSheet, View } from "react-native";

export default function App() {
  return (
    <View
      style={{
        ...styles.container,
        backgroundColor: Platform.OS === "android" ? "#3f51b5" : "#e91e63",
      }}
    >
      <Text style={styles.text}>OS: {Platform.OS}</Text>
      <Text style={styles.text}>OS Version: {Platform.Version}</Text>
      {Platform.OS === "android" ? (
        <Text style={styles.text}>
          Manufacturer: {Platform.constants.Manufacturer}
        </Text>
      ) : null}
    </View>
  );
}

// Kindacode.com
// Just some styles
const styles = StyleSheet.create({
  container: {
    flex: 1,
    flexDirection: "column",
    backgroundColor: "#fff",
    alignItems: "center",
    justifyContent: "center",
  },
  text: {
    fontSize: 30,
    fontWeight: "bold",
    fontStyle: "italic",
    color: "#fff",
  },
});
Conclusion
This article equipped you with some knowledge and practical skills to make use of the Platform API in React Native. From this point, you can implement some specific functionalities for your app to bring your users a native-like experience. If you’d like to discover more new and awesome stuff about modern React Native, take a look at the following articles:
- React Native: Make a Button with a Loading Indicator inside
- Using AsyncStorage in React Native: CRUD Example
- How to Implement a Picker in React Native
- How to render HTML content in React Native
- Working with CheckBox in React Native
- React Native: How to add shadow effects on Android
You can also check our React topic page and React Native topic page for the latest tutorials and examples.




![[Solved] React Native Error: No bundle URL present](https://www.kindacode.com/media/thumbnails/2024-11/Screen-Shot-2020-04-28-at-17.44.18-1.png)
