This article shows you how to install and get Redis ready to use on macOS, Windows, and Ubuntu.
Table of Contents
macOS
The easy and reliable way to install Redis on a Mac is using Homebrew (a free, popular, and open-source software package management system that simplifies the installation of software on macOS and Linux). If you don’t have Homebrew installed, get it by executing the following command:
/bin/bash -c "$(curl -fsSL https://raw.githubusercontent.com/Homebrew/install/HEAD/install.sh)"Now you can setup Redis by running this command:
brew install redisStart Redis:
brew services start redisTo check your Redis version, run:
redis-cli --version
// Output: redis-cli 7.0.3 or something similar to this
Now Redis is ready to work with your Node.js, PHP, or other backend applications.
If you want to stop Redis, just perform this command:
brew services stop redisWindows
Install Redis on Windows is just like installing normal software. Here’s how to get it done:
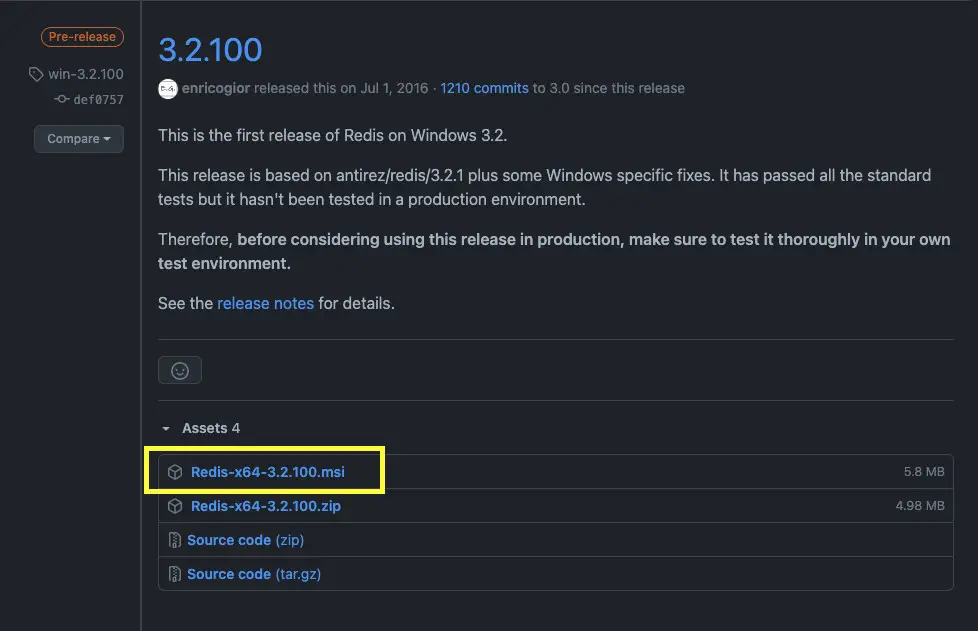
1. Go to https://github.com/MicrosoftArchive/redis/releases, select the latest version (or whatever version you like), and download the installation file (the msi file or the zip file):
2. In the download folder, run redis-server.exe
3. You should see a window appear that says redis is running on port 6379.
Ubuntu
To have Redis installed on Ubuntu, follow the steps below:
1. Update your local apt package:
sudo apt update2. Download and install Redis:
sudo apt install redis-server3. There is a change we need to make in the Redis configuration file (this one was generated during the installation). Open it:
sudo nano /etc/redis/redis.confAnd replace supervised no with supervised systemd:
# Note: these supervision methods only signal "process is ready."
#       They do not enable continuous liveness pings back to your supervisor.
supervised systemd
Save the file.
4. Restart the Redis service:
sudo systemctl restart redis.serviceFrom now on, Redis will automatically start up every time your server boots.
5. To make sure that Redis is working as expected, run the command below:
sudo systemctl status redisThe output will look like this:
● redis-server.service - Advanced key-value store
   Loaded: loaded (/lib/systemd/system/redis-server.service; enabled; vendor preset: enabled)
   Active: active (running) since Sat 2021-06-11 13:48:52 UTC; 15s ago
     Docs: http://redis.io/documentation,
           man:redis-server(1)
  Process: 2421 ExecStop=/bin/kill -s TERM $MAINPID (code=exited, status=0/SUCCESS)
  Process: 2424 ExecStart=/usr/bin/redis-server /etc/redis/redis.conf (code=exited, status=0/SUCCESS)
 Main PID: 2445 (redis-server)
    Tasks: 4 (limit: 4704)
   CGroup: /system.slice/redis-server.service
           └─2445 /usr/bin/redis-server 127.0.0.1:6379
Conclusion
Congratulation. You’ve got Redis running and ready to use on your machine.
Redis is commonly used to build cache layers in backend applications written in Node.js, Java, PHP, Python, etc, to speed up and improve performance. If you’d like to learn more about server-side stuff, take a look at the following articles:
- 7 best Node.js frameworks to build backend APIs
- Python reduce() function examples
- Merging arrays with array_merge() and spread syntax in PHP
- Top 5 best Node.js Open Source Headless CMS
- Using Axios to download images and videos in Node.js
- Deleting unnecessary Images and Containers in Docker
You can also check out our Node.js category page for the latest tutorials and examples.
