This article will show you how to handle TextInput, Button events in React Native with the useState hook. You will also learn how to dismiss the device’s keyboard after the button is pressed by using the Keyboard API.
Overview
The useState hook
The useState hook is a special function that lets you add React state to function components. It takes only one argument that is the initial state (a string, an object, an array, etc), and returns a pair of values: the current state and a function that updates it.
Simple usage:
import React, { useState } from 'react';
import { View } from 'react-native';

const MyComponent = props => {
  const [value, setValue] = useState('initial value');

  // This function is triggered in some way
  const myFunction = () => {
    setValue('a new value');
  }

  return <View>
    {/** Something here **/}
  </View>;
}
For a better understanding, see the end-to-end example below.
Hide the soft keyboard
To dismiss the soft keyboard, just import the Keyboard module then call the Keyboard.dismiss() method, like this:
import {
  Keyboard,
} from 'react-native';

// Trigger his function to close the soft keyboard
const hideKeyboard = () => {
    Keyboard.dismiss();
};
The Complete Example
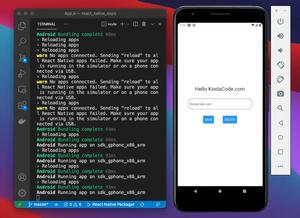
Our example app contains a TextInput, a Button, and two Text components. When the user types his or her name into the TextInput, a greeting will appear. When the Button is hit, everything in the TextInput will be cleared and the soft keyboard will go away.
Preview
Android:
iOS:
The Full Code
Remove unwanted code in your App.js file and add the following:
// App.js
import React, { useState } from 'react';
import {
  StyleSheet,
  Text,
  View,
  Keyboard,
  TextInput,
  Button,
} from 'react-native';

export default function App() {
  // initize the state hook
  const [name, setName] = useState('');

  // Whenever the textinput value changes
  const txtHandler = (enteredName) => {
    setName(enteredName);
  };

  // This function is triggered when the buttion is pressed
  const btnHandler = () => {
    // clear the text field
    setName('');

    // dismiss the Keybaord
    Keyboard.dismiss();
  };

  return (
    <View style={styles.container}>
      <Text style={styles.text}>Enter your name:</Text>
      <TextInput
        style={styles.input}
        placeholder="Enter your name"
        value={name}
        onChangeText={txtHandler}
      />
      <Button title="Clear" onPress={btnHandler} />
      <View style={styles.result}>
        <Text style={styles.text}>
          {name !== ''
            ? `Hello ${name}`
            : 'Plese and your name'}
        </Text>
      </View>
    </View>
  );
}

// styling
// Kindacode.com
const styles = StyleSheet.create({
  container: {
    marginTop: 100,
    flex: 1,
    backgroundColor: '#fff',
    alignItems: 'center',
    justifyContent: 'flex-start',
  },
  text: {
    fontSize: 24,
  },
  input: {
    padding: 10,
    marginVertical: 20,
    width: 200,
    fontSize: 18,
    borderBottomColor: '#ddd',
    borderBottomWidth: 1,
  },
  result: {
    marginTop: 30,
    paddingHorizontal: 30,
    display: 'flex',
  }
});
Conclusion
In this article, you’ve learned the fundamentals of handling TextInput and Button events by using the useState hook. From now on, you can use these basics to handle and deal with more complex real-world situations.
If you would like to explore more things about React Native, don’t miss the following articles:
- How to render HTML content in React Native
- React Native FlatList: Tutorial and Examples
- Working with CheckBox in React Native
- Top 4 open-source React Native UI libraries these days
- How to Get the Window Width & Height in React Native
You can also check our React topic page and React Native topic page for the latest tutorials and examples.
![[Solved] React Native Error: No bundle URL present](https://www.kindacode.com/media/thumbnails/2024-11/Screen-Shot-2020-04-28-at-17.44.18-1.png)
