This article shows you how to highlight the currently active link in React Router. We’ll discover the approach to do so then walk through a complete example of using this knowledge in practice.
Note: We’ll use React Router 6 (the latest version)
Table of Contents
Overview
To determine whether a link is active or not in React Router 6, we use the <NavLink> component like so:
<NavLink
        to="/some-page"
        className={({ isActive }) =>
                      (isActive ? "lactive-class" : "not-active-class")}
>
        Some Page
</NavLink>
If you prefer inline-style, you can do like this:
<NavLink
        to="/some-page"
        style={({ isActive }) =>
                      (isActive ? {color: 'red'} : {color: 'blue'})}
>
        Some Page
</NavLink>
For more clarity, please see the complete example below.
Note: In React Router 5 and other older versions, you have the activeClassName and activeStyle props but these things no longer exist in React Router 6.
The Example
App Preview
The small sample project we are going to build has 3 pages (routes) as follows:
- /: HomePage
- /about: AboutPage
- /contact: ContactPage
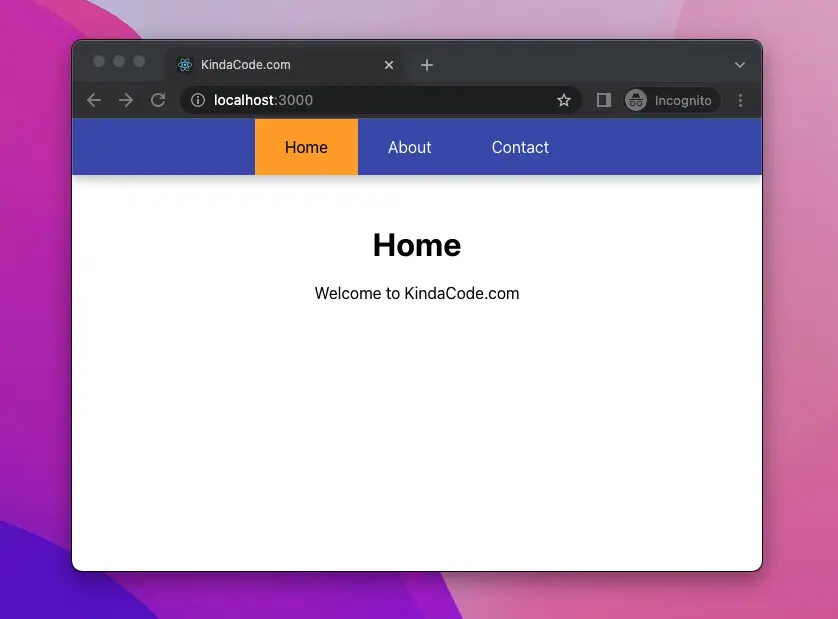
You can navigate between pages by using the blue navigation bar. The non-active links will be white and the active link will be dark with an orange background color.
Here’s how it works:
The Code
1. Initialize a new React project by executing the command below:
npx create-react-app kindacode_example2. Install react-router-dom:
npm i react-router-dom3. The final source code in src/App.js with explanations (for simplicity’s sake, I put all React components in a single file):
// App.js
import React from "react";
import "./App.css";

import { BrowserRouter, Routes, Route, NavLink } from "react-router-dom";

const App = () => {
  return (
    <BrowserRouter>
      <Routes>
        <Route path="/" element={<HomePage />} />
        <Route path="/about" element={<AboutPage />} />
        <Route path="/contact" element={<ContactPage />} />
      </Routes>
    </BrowserRouter>
  );
};

// The Navigation Bar
// This component will be used on all three pages: Home, About, and Contact
const NavBar = () => {
  return (
    <nav>
      <NavLink
        to="/"
        className={({ isActive }) => (isActive ? "link-active" : "link")}
      >
        Home
      </NavLink>
      <NavLink
        to="/about"
        className={({ isActive }) => (isActive ? "link-active" : "link")}
      >
        About
      </NavLink>
      <NavLink
        to="/contact"
        className={({ isActive }) => (isActive ? "link-active" : "link")}
      >
        Contact
      </NavLink>
    </nav>
  );
};

// Home Page
const HomePage = () => {
  return (
    <div>
      <NavBar />
      <div className="content">
        <h1>Home</h1>
        <p>Welcome to KindaCode.com</p>
      </div>
    </div>
  );
};

// About Page
const AboutPage = () => {
  return (
    <div>
      <NavBar />
      <div className="content">
        <h1>About</h1>
        <p>This is about page</p>
      </div>
    </div>
  );
};

// Contact Page
const ContactPage = () => {
  return (
    <div>
      <NavBar />
      <div className="content">
        <h1>Contact</h1>
        <p>Some contact information</p>
      </div>
    </div>
  );
};

export default App;
4. In order to make our app looks nice, we need some CSS. Replace the unwanted code in src/App.css with the snippet below:
nav {
  height: 56px;
  display: flex;
  justify-content: center;
  align-items: center;
  background: #3f51b5;
  box-shadow: 0 5px 10px #ccc;
}

/* Basic styles for nav links */
nav a {
  display: flex;
  align-items: center;
  padding-left: 30px;
  padding-right: 30px;
  height: 100%;
  text-decoration: none;
}

/* Specific styles for non-active links */
.link {
  color: white;
}

/* Specific styles for active links */
.link-active {
  color: black;
  background: orange;
}

.content {
  margin-top: 50px;
  text-align: center;
}
5. Run the app and go to http://localhost:3000 to check the result:
npm startConclusion
We’ve explored the technique to highlight an active link in React Router and examined an end-to-end example of implementing this stuff in action. If you’d like to learn more new and interesting things about modern React development, take a look at the following articles:
- React + TypeScript: Handling onScroll event
- React Router Dom: Implement a Not Found (404) Route
- React + TypeScript: Multiple Dynamic Checkboxes
- React + TypeScript: Making a Custom Context Menu
- React: Show Image Preview before Uploading
- React + TypeScript: Multiple Select example
The React Router official documentation is a great place to get more insights about React Router. You can also check our React topic page and React Native topic page for the latest tutorials and examples.
