When building websites or mobile apps, there will be occasions when you want to create underlined text with the aim of making it stand out from other text, such as links, certain sentences or words. special language to emphasize, etc.
This article walks you through a few examples of underlining Text in Flutter (with instructions and explanations), in order from easy to advanced, from simple to complex.
Example 1: Basic
The TextStyle class has a parameter named decoration that can be used to add an underline to your Text widget. By default, the line has the same color as the text.
Screenshot:
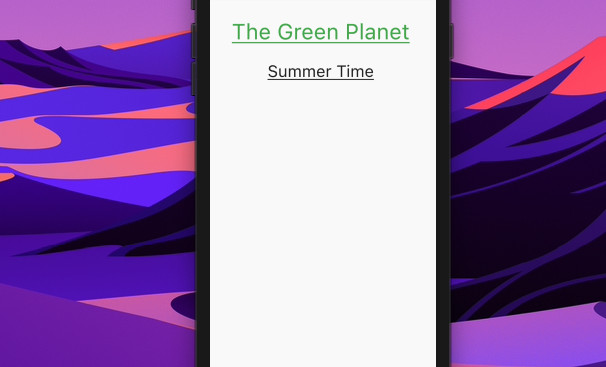
The code:
Column(
          children: const [
            Text(
              'The Green Planet',
              style: TextStyle(
                  fontSize: 40,
                  color: Colors.green,
                  decoration: TextDecoration.underline),
            ),
            SizedBox(
              height: 30,
            ),
            Text(
              'Summer Time',
              style:
                  TextStyle(fontSize: 30, decoration: TextDecoration.underline),
            )
          ],
        ),
Example 2: Styling the Underline
You can also control how the underline looks by using the following options provided by the TextStyle class:
- decorationStyle: solid (default), dashed, dotted, wavy, double
- decorationThickness: How thick your underline is
- decorationColor: Control the color of the underline
Screenshot:
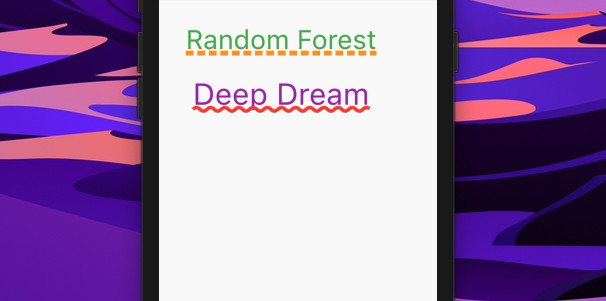
The code:
Column(
          children: const [
            Text(
              'Random Forest',
              style: TextStyle(
                  fontSize: 40,
                  color: Colors.green,
                  decoration: TextDecoration.underline,
                  decorationStyle: TextDecorationStyle.dashed,
                  decorationColor: Colors.orange,
                  decorationThickness: 3),
            ),
            SizedBox(
              height: 30,
            ),
            Text(
              'Deep Dream',
              style: TextStyle(
                fontSize: 45,
                color: Colors.purple,
                decoration: TextDecoration.underline,
                decorationStyle: TextDecorationStyle.wavy,
                decorationThickness: 2,
                decorationColor: Colors.red,
              ),
            )
          ],
        ),
Example 3: Adding some Space between Text and Underline
You can control the gap between text and its underlining by adding a drop shadow and making the original text transparent. The Y offset of the shadow will determine the gap. Setting it to a negative number helps you to increase the space.
Note that what you see on the screen is the shadow of the text, not the actual text (because it’s transparent).
Screenshot:

The code:
Scaffold(
      appBar: AppBar(
        title: const Text('KindaCode.com'),
      ),
      body: const Center(
        child: Text(
          'The Big Dog',
          style: TextStyle(
              fontSize: 40,
              color: Colors.transparent,
              fontWeight: FontWeight.bold,
              shadows: [Shadow(offset: Offset(0, -20), color: Colors.black)],
              decoration: TextDecoration.underline,
              decorationStyle: TextDecorationStyle.dashed,
              decorationColor: Colors.green,
              decorationThickness: 4),
        ),
      ),
);
Example 4: Underlining only a few words of a paragraph
You can use RichText and TextSpan to underline only some parts of a paragraph.
Screenshot:
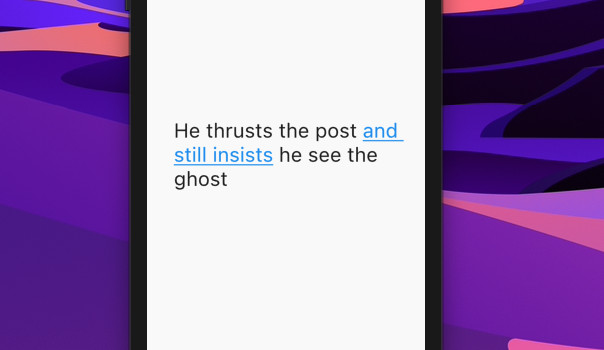
The code:
Scaffold(
      appBar: AppBar(
        title: const Text('KindaCode.com'),
      ),
      body: Center(
        child: Padding(
          padding: const EdgeInsets.all(30),
          child: RichText(
            text: const TextSpan(
                style: TextStyle(fontSize: 30, color: Colors.black),
                children: [
                  TextSpan(
                    text: 'He thrusts the post ',
                  ),
                  TextSpan(
                      text: 'and still insists',
                      style: TextStyle(
                          decoration: TextDecoration.underline,
                          color: Colors.blue)),
                  TextSpan(text: ' he see the ghost')
                ]),
          ),
        ),
      ),
);
Conclusion
We’ve gone through serveral different examples of underlining Text in Flutter. Keep the ball rolling and continue learning more interesting stuff by reading also these articles:
- How to disable Web and Desktop support in Flutter
- Flutter + Firebase Storage: Upload, Retrieve, and Delete files
- Flutter: Make a TextField Read-Only or Disabled
- Working with TextButton in Flutter
- Flutter and Firestore Database: CRUD example
- Flutter StreamBuilder examples
You can also check out our Flutter topic page or Dart topic page for the latest tutorials and examples.


