In React Native, AsyncStorage is a great solution to locally save a small or medium amount of data on the user’s device like authentication information, app settings, etc. It’s worth noting that AsyncStorage only accepts string data but you can store object data by converting it to JSON with JSON.stringify().
This article walks you through a complete example of performing CRUD operations (Create, Read, Update, and Delete data) by using AsyncStroage in React Native.
Table of Contents
A Quick Note
AsyncStorage.setItem can either update an existing entry if it did exist for a given key or add a new one otherwise:
await AsyncStorage.setItem("@key", value)To retrieve an item by key:
const data = await AsyncStorage.getItem("@key")To remove an item by key:
await AsyncStorage.removeItem("@key");To clear all data stored with AsyncStorage at once:
await AsyncStorage.clear()The Example
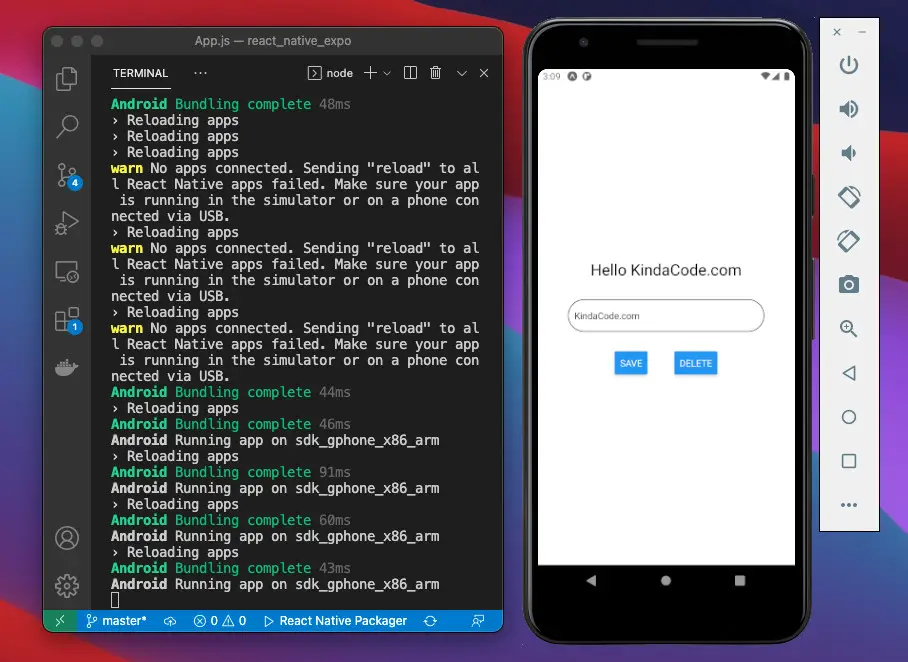
App Preview
This app allows the user to set their nickname so that they can have a personal and unique experience:
Even after you reload the app, the data is still there. If you have a closer look, you will notice that when a button is pressed, the soft keyboard will disappear. To achieve so, we use this:
Keyboard.dismiss();Installing
In the old days, AsyncStorage API was a part of React Native core, but now it is deprecated, and you should use the @react-native-async-storage/async-storage package instead.
For React Native Expo projects:
expo install @react-native-async-storage/async-storageIf you’re working with React Native CLI, run the following:
npm i @react-native-async-storage/async-storageOr:
yarn add @react-native-async-storage/async-storageIf you want to run your app on iOS, you need to link the module by executing the following command (this is not required for Expo):
npx pod-installNow it is ready to be used:
import AsyncStorage from '@react-native-async-storage/async-storage';The Code
Here’s the complete code in App.js that produces the app above:
// App.js
import React, { useState, useEffect } from "react";
import {
  Button,
  StyleSheet,
  Text,
  TextInput,
  View,
  Keyboard,
} from "react-native";
import AsyncStorage from "@react-native-async-storage/async-storage";

export default function App() {
  const [nickname, setNickname] = useState();

  // Load data when the app starts
  useEffect(() => {
    const firstLoad = async () => {
      try {
        const savedNickname = await AsyncStorage.getItem("@nickname");
        setNickname(savedNickname);
      } catch (err) {
        console.log(err);
      }
    };

    firstLoad();
  }, []);

  // Create or Update nickname
  const saveNickname = async () => {
    try {
      await AsyncStorage.setItem("@nickname", nickname);
    } catch (err) {
      console.log(err);
    }

    Keyboard.dismiss();
  };

  // Delete nickname
  const removeNickname = async () => {
    try {
      await AsyncStorage.removeItem("@nickname");
      setNickname();
    } catch (err) {
      console.log(err);
    }
    Keyboard.dismiss();
  };

  return (
    <View style={styles.container}>
      {nickname ? (
        <Text style={styles.heading}>Hello {nickname}</Text>
      ) : (
        <Text style={styles.heading}>Create your nickname</Text>
      )}

      <TextInput
        placeholder="Enter Your Nickname"
        style={styles.textInput}
        value={nickname}
        onChangeText={(value) => {
          setNickname(value);
        }}
      />

      <View style={styles.buttonContainer}>
        <Button title="Save" onPress={saveNickname} />
        <Button title="Delete" onPress={removeNickname} />
      </View>
    </View>
  );
}

// Kindacode.com
// Just some styles
const styles = StyleSheet.create({
  container: {
    flex: 1,
    flexDirection: "column",
    backgroundColor: "#fff",
    alignItems: "center",
    justifyContent: "center",
  },
  heading: {
    fontSize: 24,
  },
  textInput: {
    width: 300,
    marginVertical: 30,
    padding: 10,
    borderWidth: 1,
    borderColor: "#000",
    borderRadius: 50,
  },
  buttonContainer: {
    width: 240,
    display: "flex",
    flexDirection: "row",
    justifyContent: "space-evenly",
  },
});
Conclusion
You’ve learned how to persist data offline with AsyncStorage. If you would like to explore more new and exciting stuff about modern React Native, then take a look at the following articles:
- How to Implement a Picker in React Native
- Using Image Picker and Camera in React Native (Expo)
- React Native – How to Update Expo SDK
- React Native FlatList: Tutorial and Examples
- How to Create a Confirm Dialog in React Native
- Using Switch component in React Native (with Hooks)
You can also check our React topic page and React Native topic page for the latest tutorials and examples.

![[Solved] React Native Error: No bundle URL present](https://www.kindacode.com/media/thumbnails/2024-11/Screen-Shot-2020-04-28-at-17.44.18-1.png)
